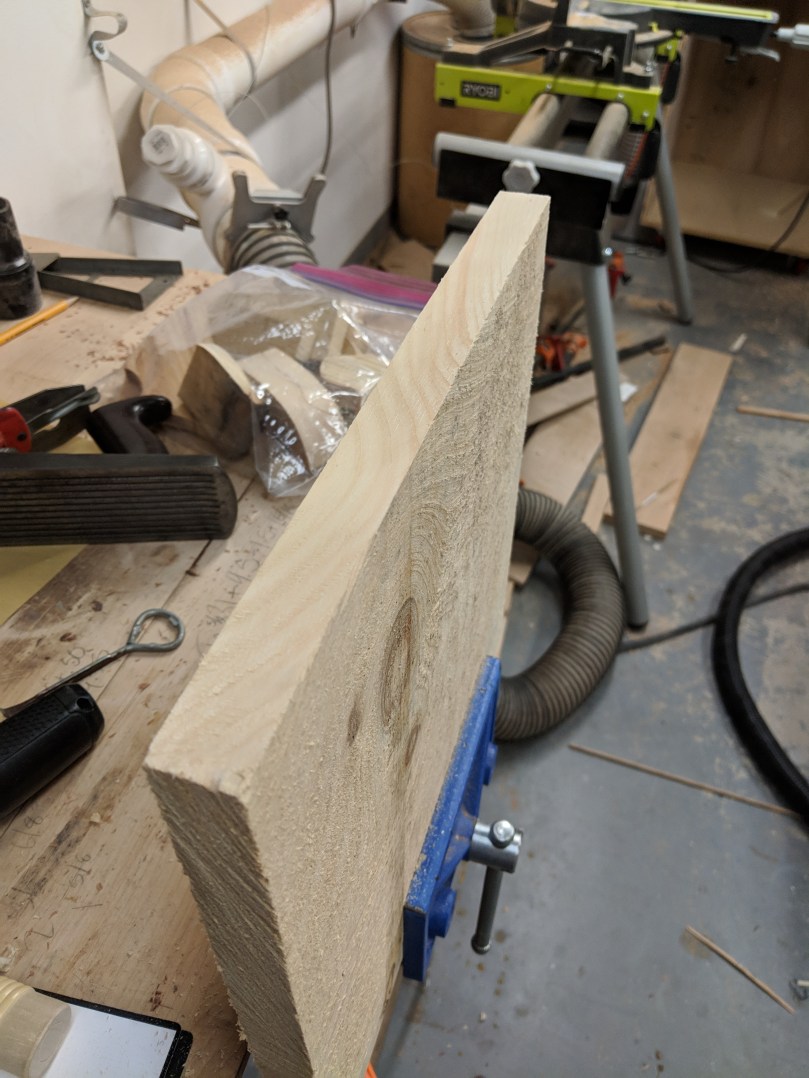
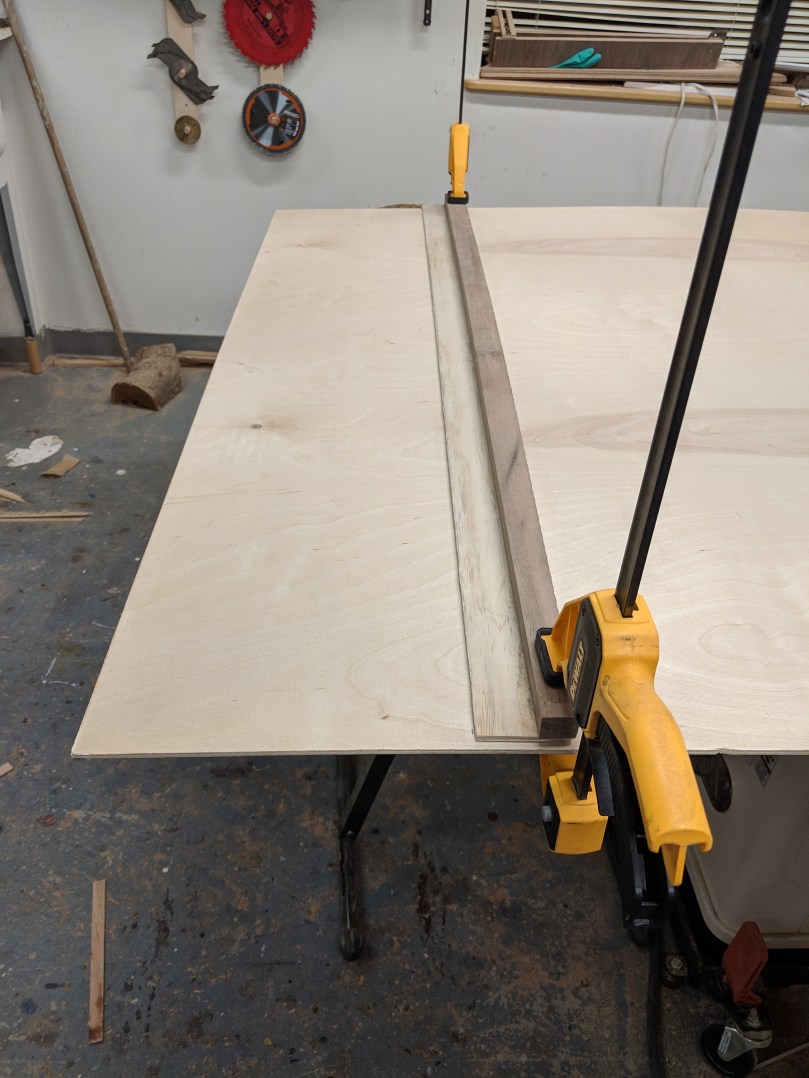
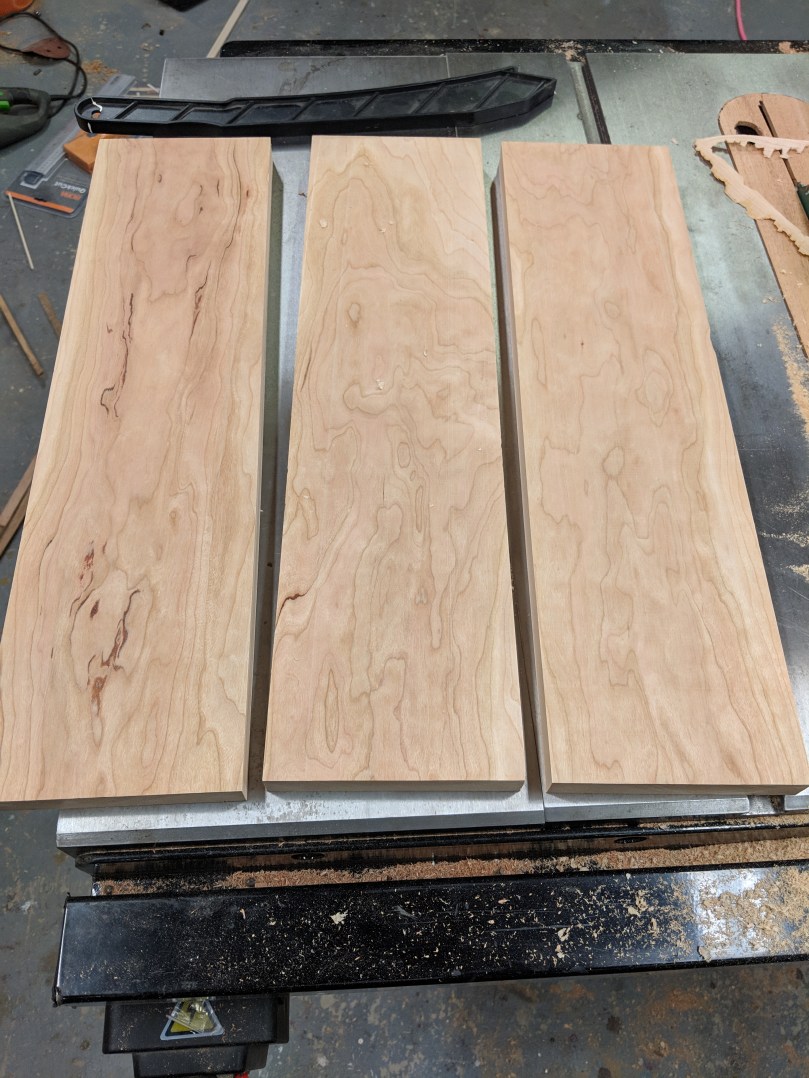
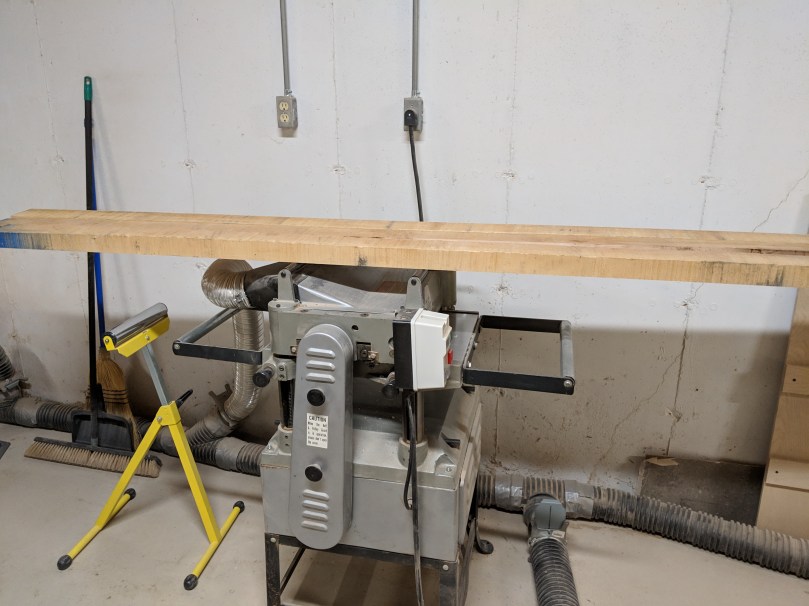
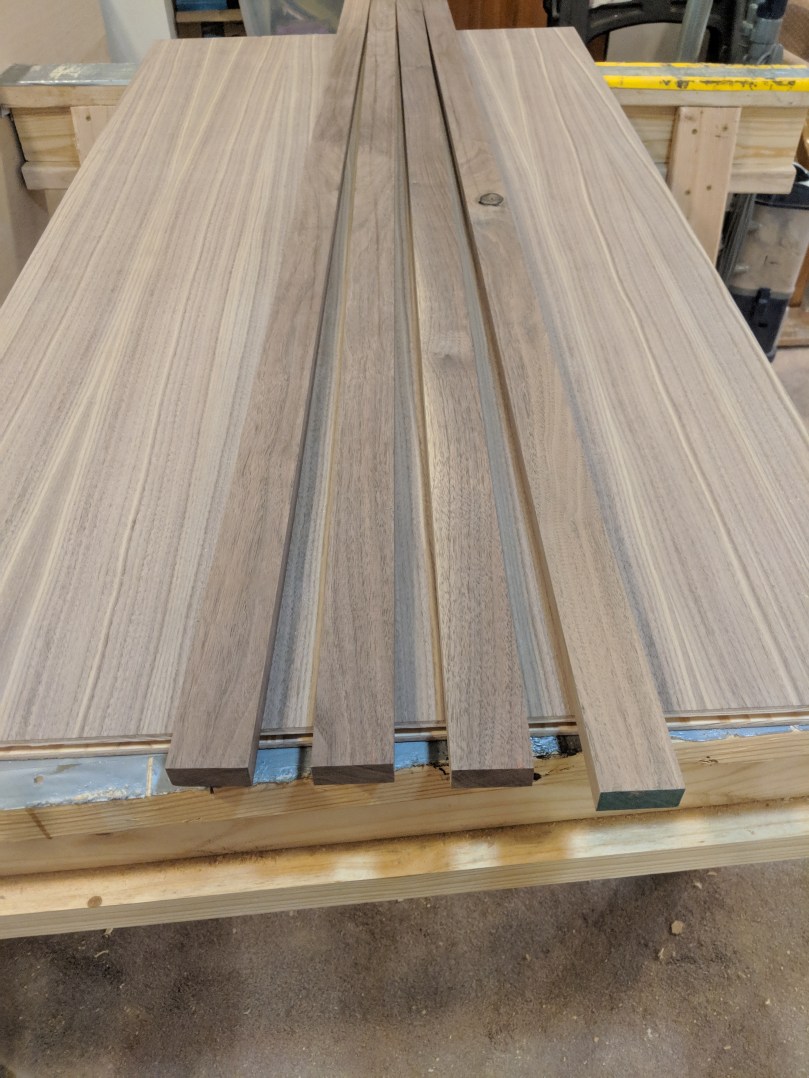
It’s time for the exciting conclusion to this coffee table build: the ebonized walnut top with inlay banding. I know, it sounds complicated! It really isn’t though; you can do all of this build with a circular saw and a router, if that’s all you had.Start by ripping some 4/4 walnut into strips that are 1 5/8″ wide. This will allow for a 3/8″ deep tongue that will go into the plywood, and a 1.25″ solid frame for the plywood. The plywood piece should be 50″ long by 27″ wide. You’ll note that this is a bit different from the measurements I put in the last part for the total dimensions. It’s going to actually be 52.5 x 29.5″ wide. I was originally planning on a 1″ board but 1.25″ looked better. Plane it to be exactly as thick as the plywood.
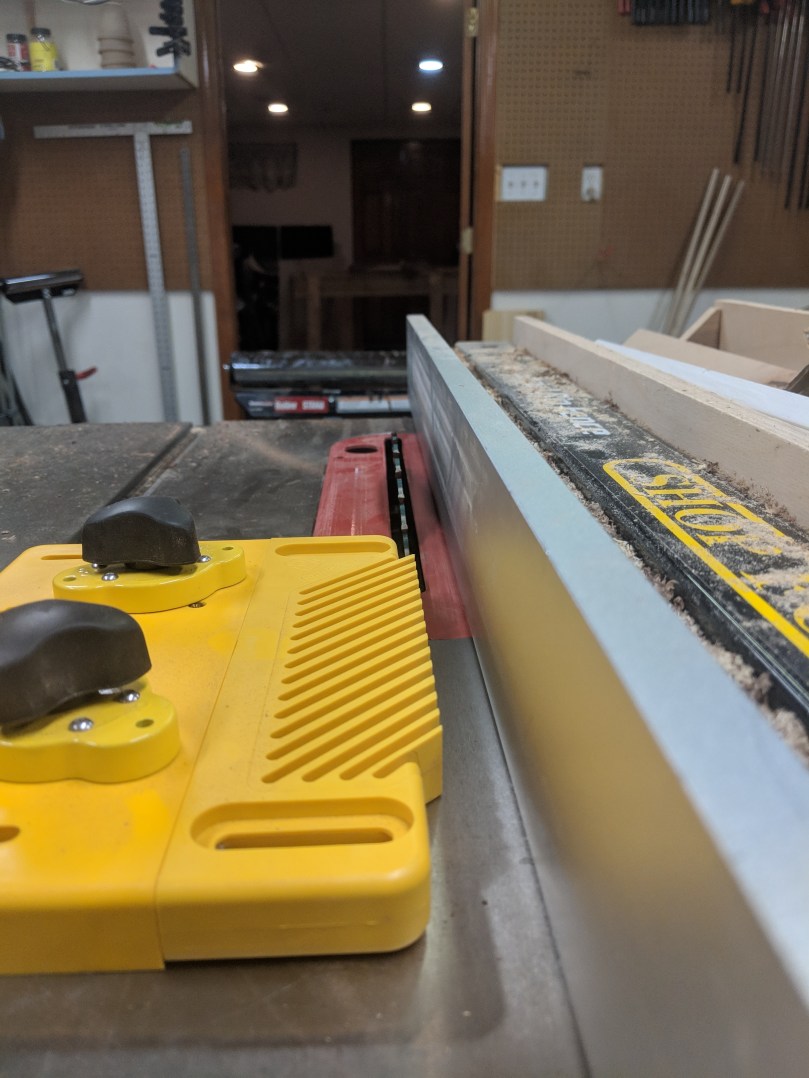
Using a slot cutting bit with a 1/4″ tall cutter, cut a groove on every edge of the plywood that is centered. Try to get as close to centered as you can when adjusting the bit depth; my plywood had a 1/4″ thick MDF core I used to line everything up. To ensure it’s dead centered, flip the plywood and route again from that side.
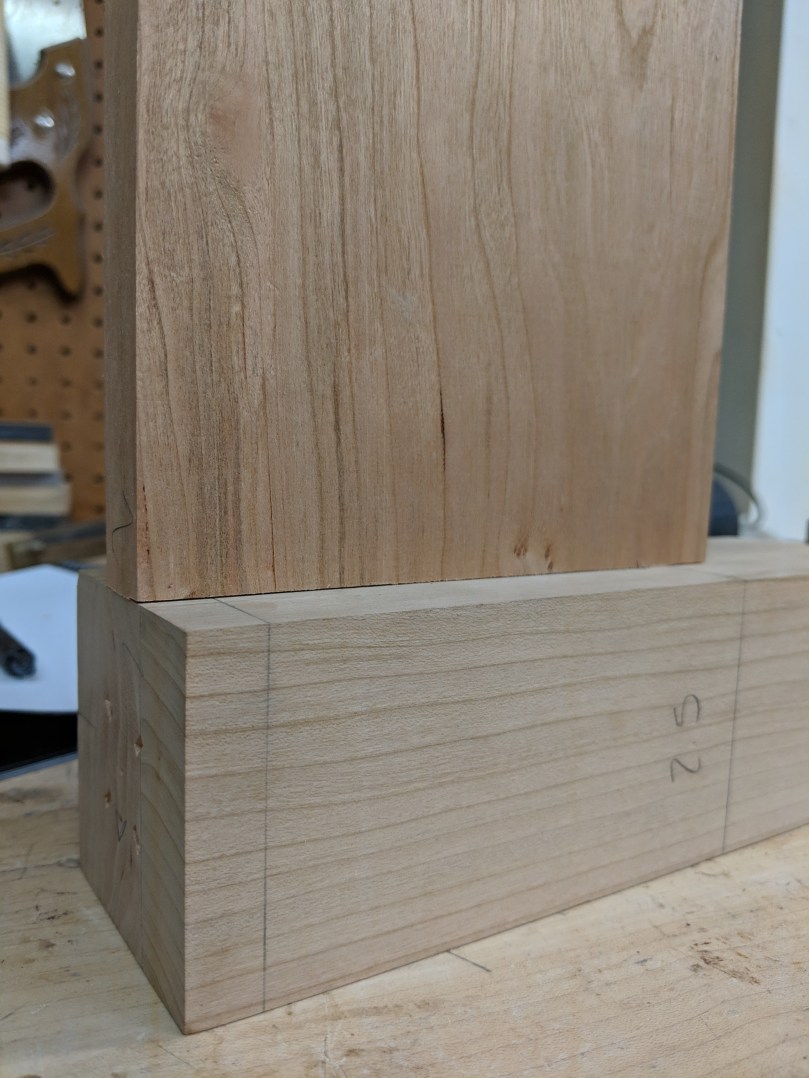
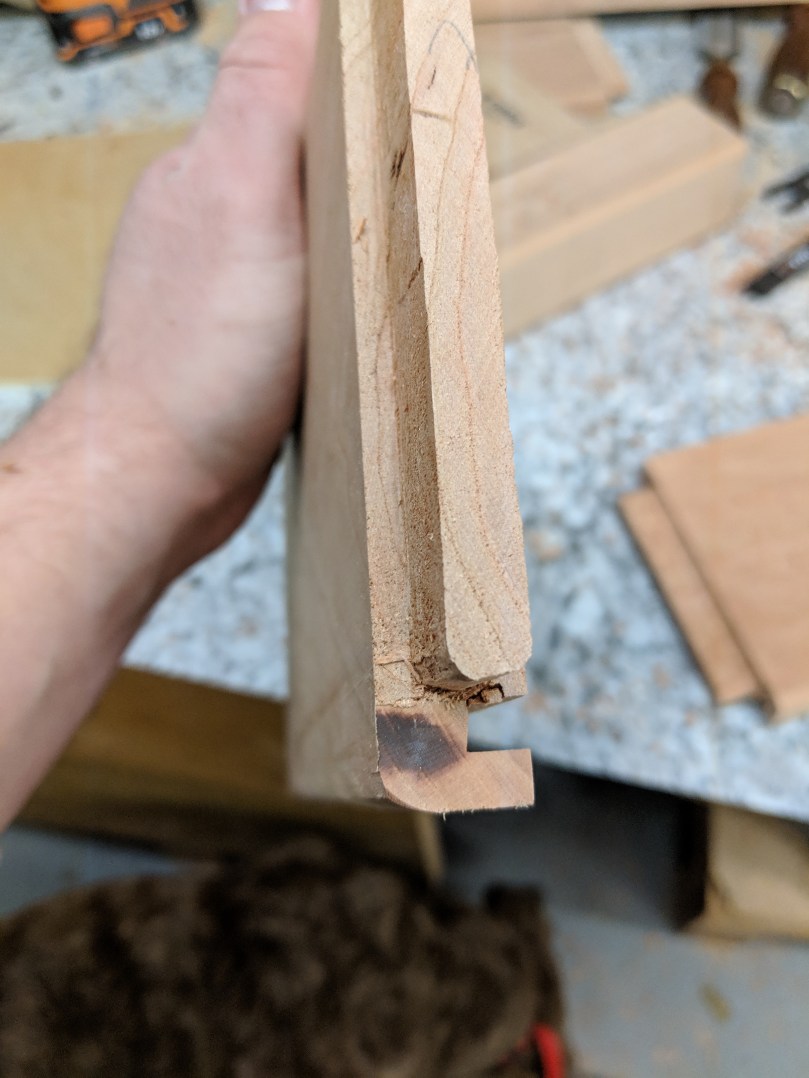
Now, create a matching, centered tongue on the walnut lumber that is 3/8″ deep. You can use a router table; I used a dado on my table saw. You could also use the same slot cutting bit, using the bearing to guide it. You have options!
I decided to add a really, really subtle to the bottom of the walnut frame. The legs have a 4 degree slope on them, so I added a 4 degree chamfer to the underside. I used a featherboard to hold it tight, and put that slight chamfer on with the table saw. Barely noticeable, but trying to pull elements together on this design.
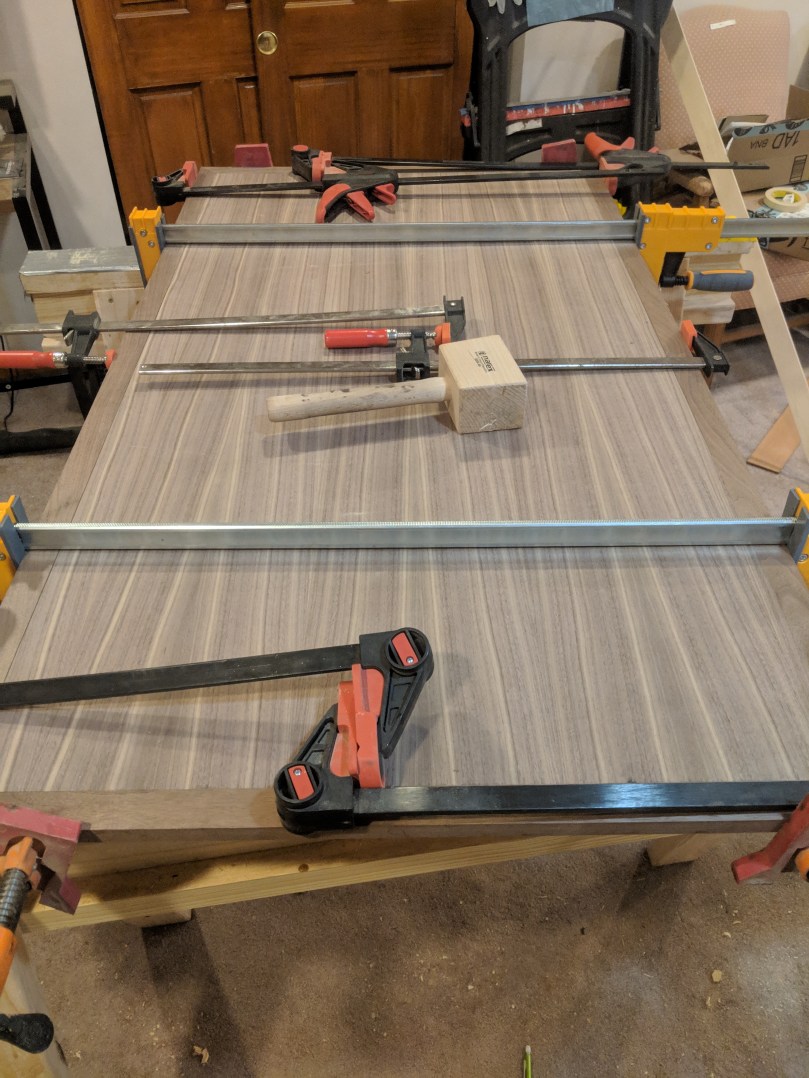
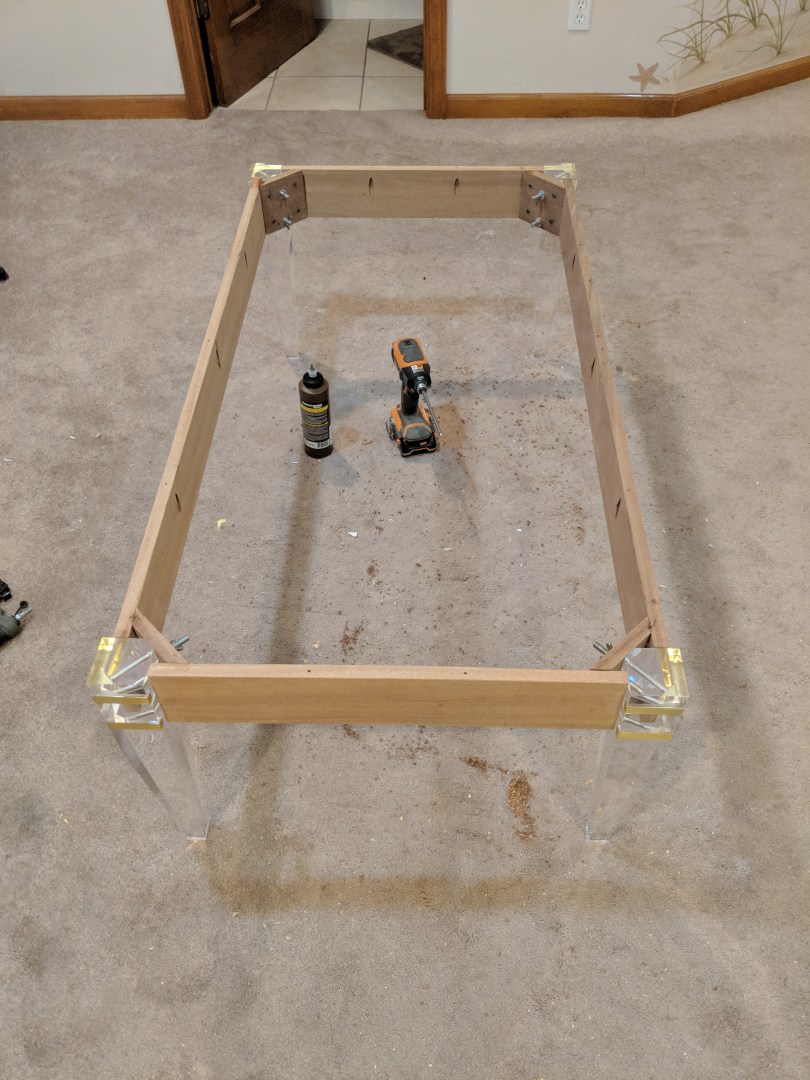
Using the miter sled on your table saw, cut mitered corners on everything. Make sure they’re as tight as you can get them and dry fit everything together. Once it looks good, place some Titebond Dark glue in the groove, put everything together, and clamp.
Sometimes you have to get creative with your clamps
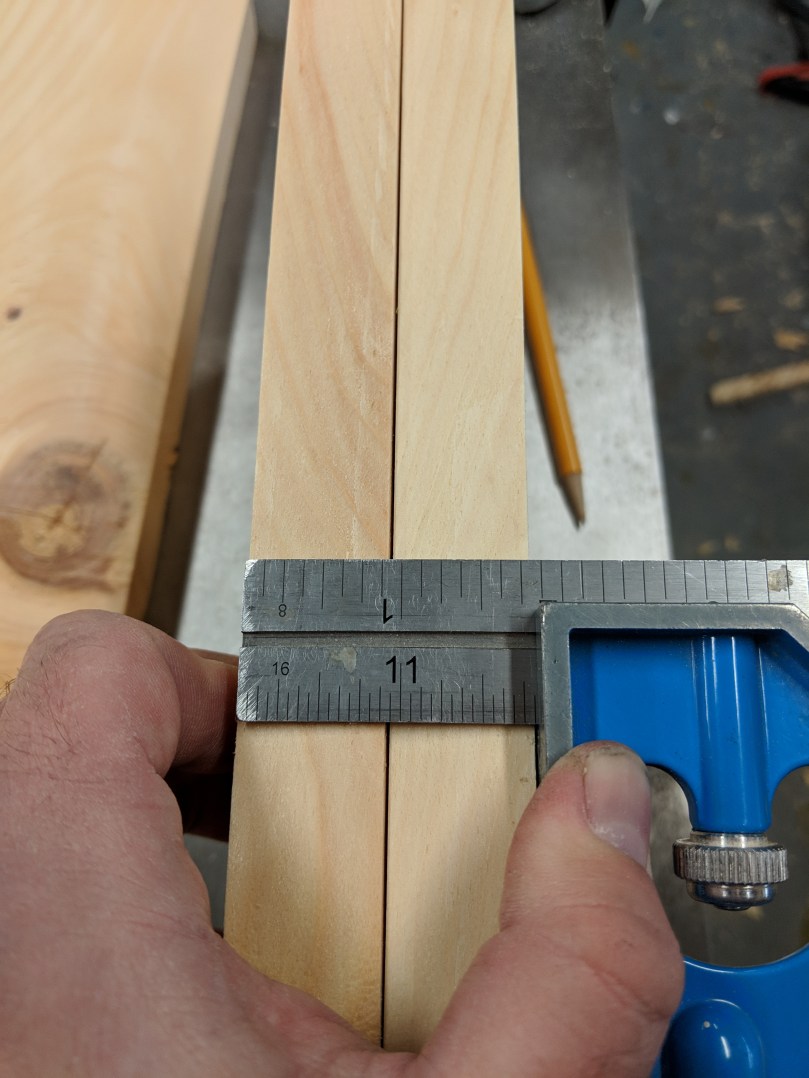
I like to put a spline on all my mitered corners to reinforce them. Miters are mostly end-grain joints, so by adding a spline you add a method to connect them with long-grain, which glues better. The easiest way I’ve found to do this on a large piece is use two cutoffs to create a flat reference edge. Then use the slot bit.
You can either immediately glue in a walnut spline, or wait until after the ebonizing to add a contrasting wood.Here’s how it looks once it’s all put together!
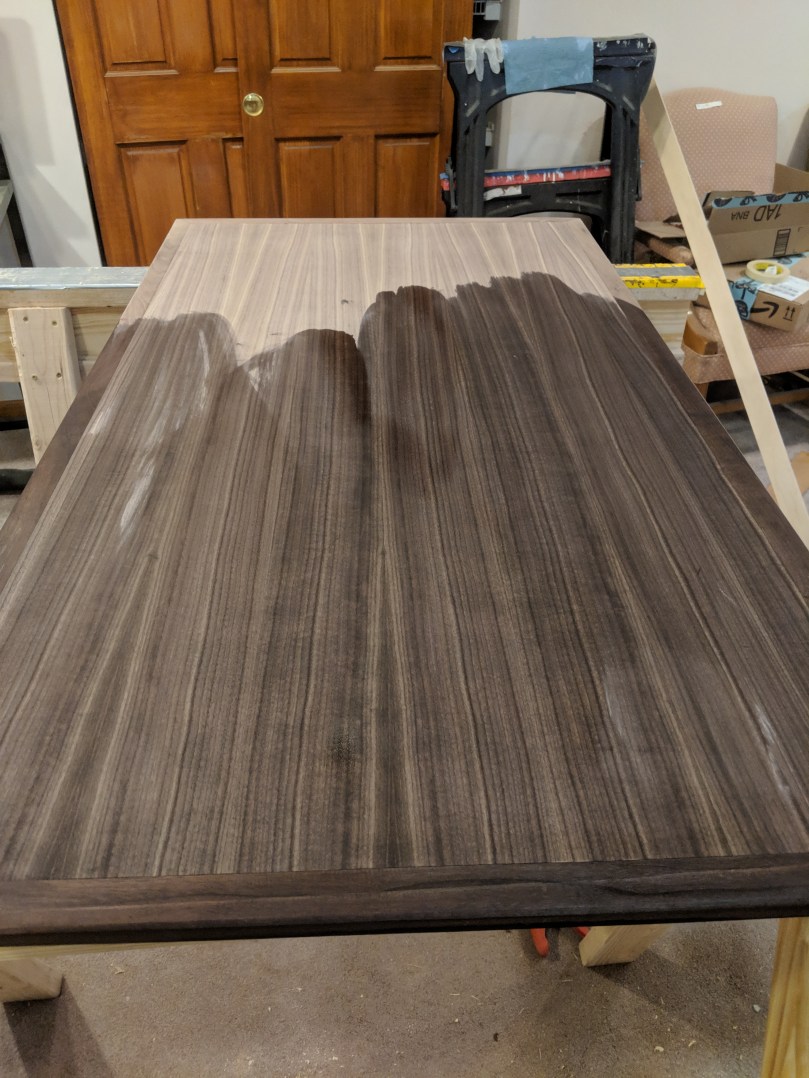
Now comes the truly magical part: ebonizing! Take that solution we set aside a week ago, and strain it through a coffee filter. I tried a few different dilution rates, and I settled on 50% of the mixture plus 50% more vinegar. This gave it a deep, rich black color but allowed some of the grain to still show through.
The reason this works is the mixture we created is actually iron-acetate. It’s a chemical that, when it reacts with tannins in wood, turns the wood black. Any wood with a high tannin content will work; oak, cherry, or walnut. Since walnut is already pretty dark, you may have better results. The grain is also more subtle than oak.
Apply it with a clean soft rag, making sure the walnut is uniformly damp, but not soaking wet. Here’s a video showing me applying some!
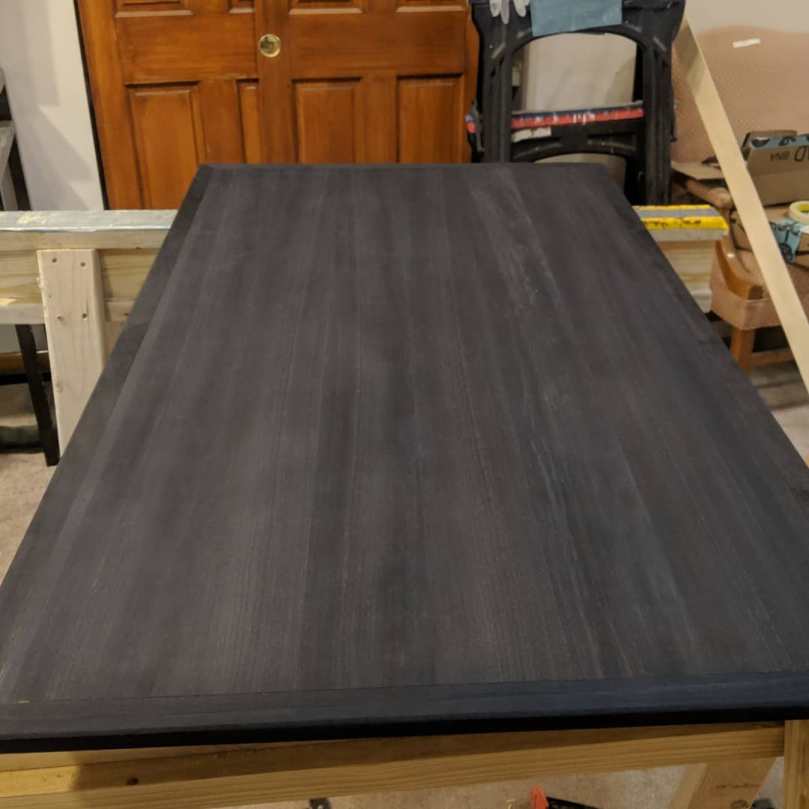
Just immediately after applying the solution you can start to see the effectsAfter one full night of drying. The wood will look less purple once it receives a top coat.
To protect the thin veneer on the plywood for the next stage, coat the top with two coats of a dewaxed shellac sanding sealer. This will keep the ebony from being removed as well.
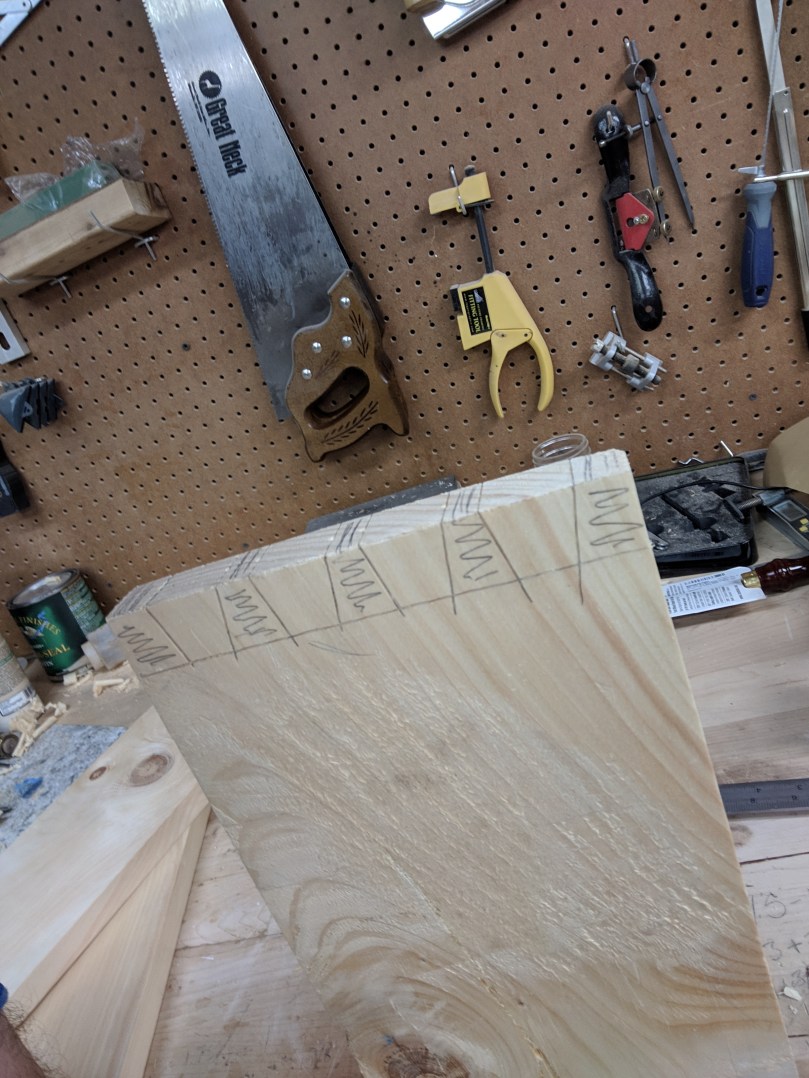
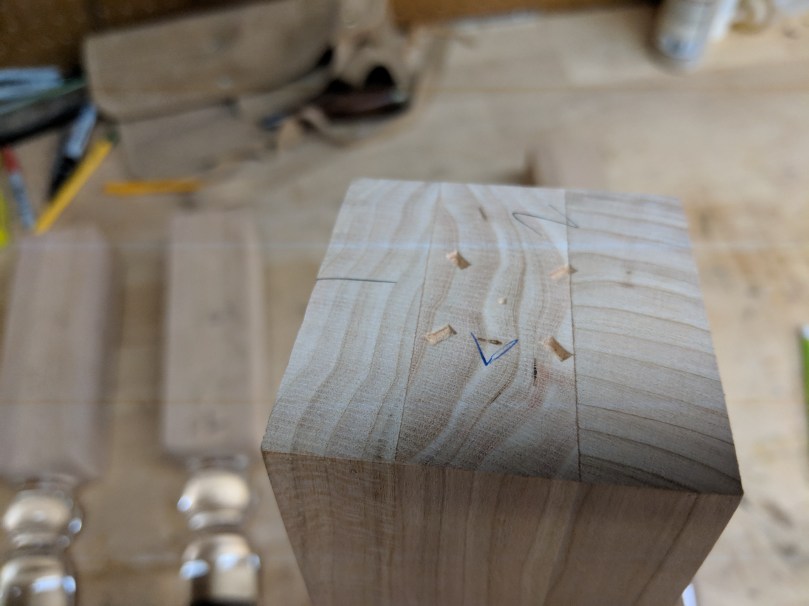
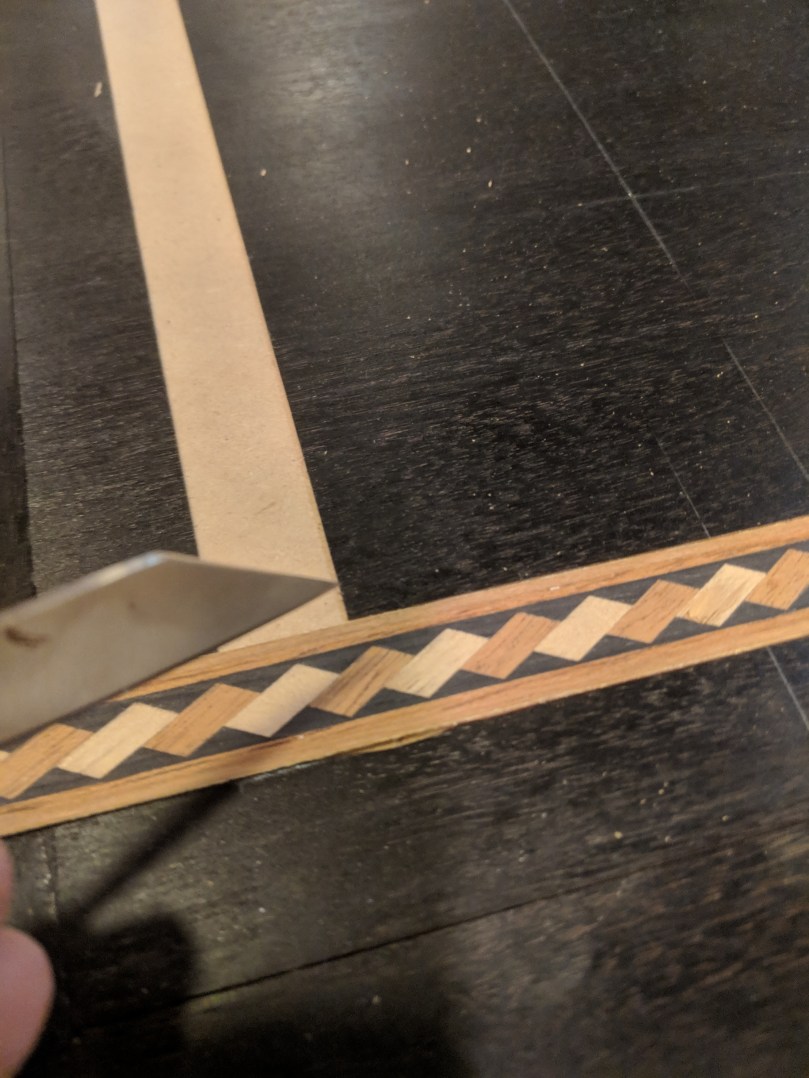
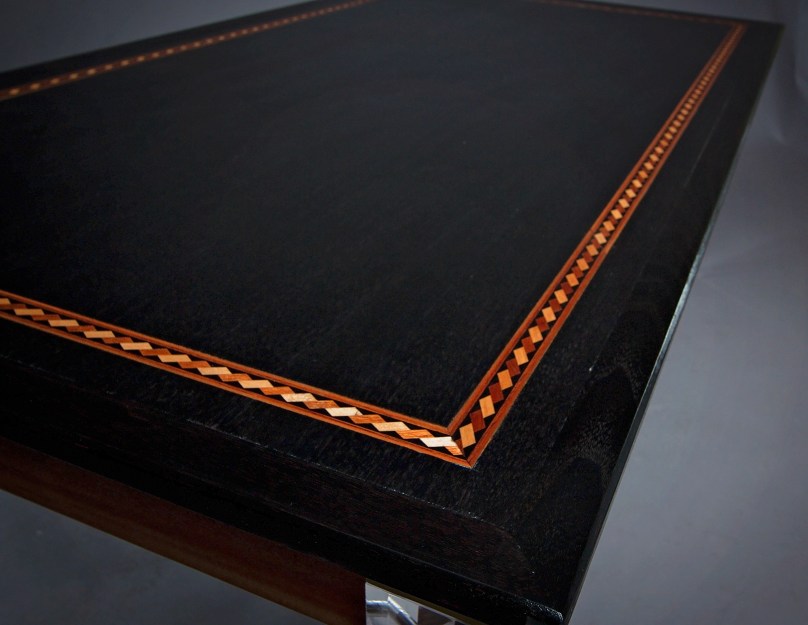
Mark out your corners. I decided to use 1 inch in from the edge of the walnut plywood. These lines are there to tell you when to stop your router; you’ll use a sharp chisel to clean up the corners.
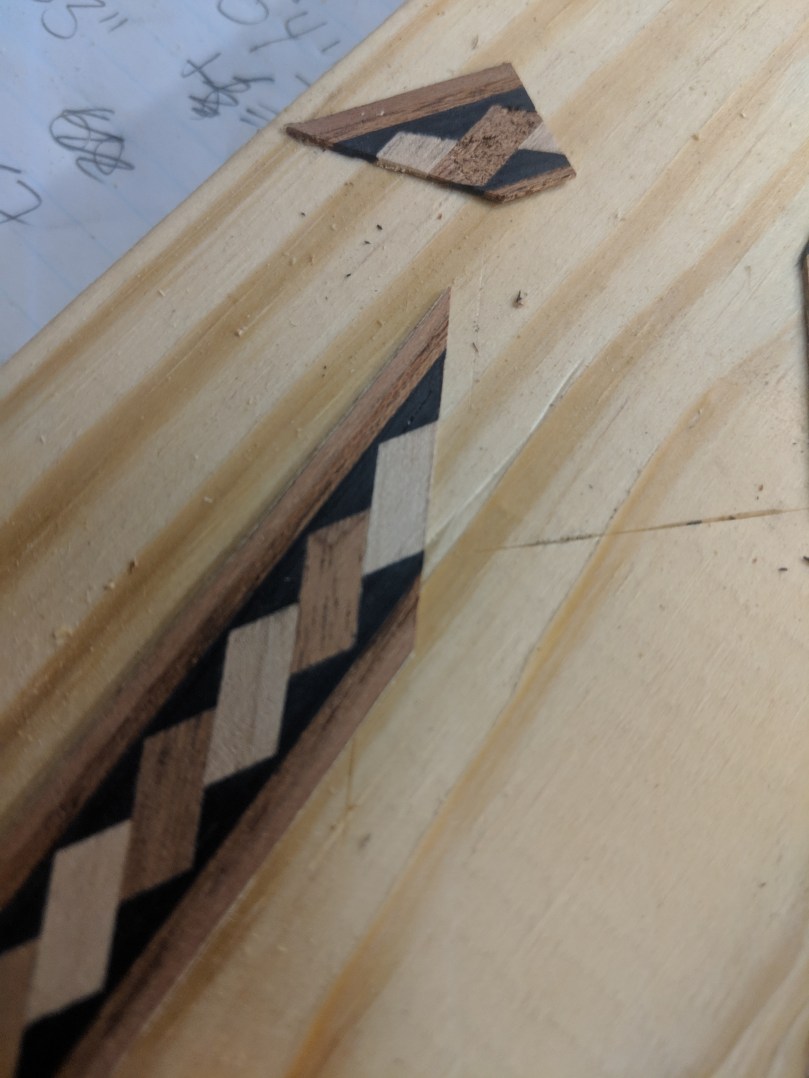
The inlay banding comes in 40 inch sections. We will use four of them for this table, using a scarf joint to create the longer sections. It’s 13/16ths of an inch wide. You’ll need a straight cutting router bit and a router with a guide fence to route the channel. My router came with a guide, but you may need to buy one depending on your model. You can also clamp a straight edge to the table and use that to guide your router. Make sure you check the depth of cut on a scrap before attempting it on the table.
You can see the marks the router guide left; they will easily sand off from the shellac with a light hand sanding
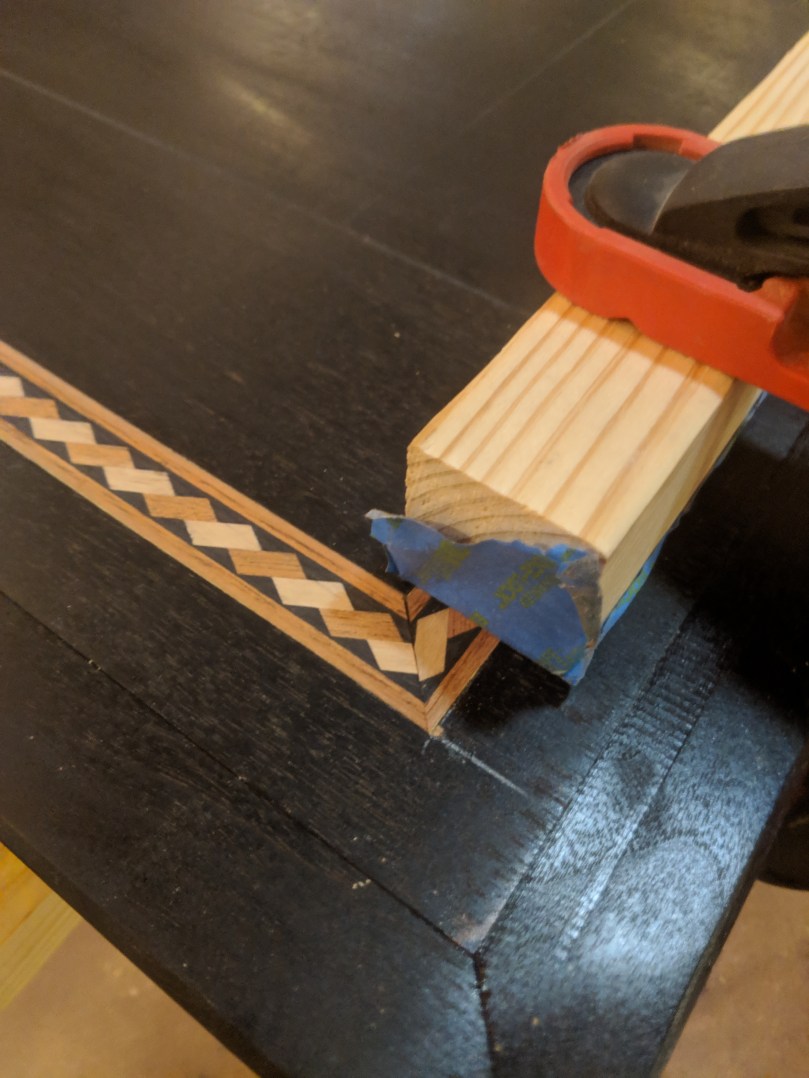
The only tools you need for cutting the inlay are a sharp knife and a straight edge. In theory, they should be 45 degree angles on each corner. I found the fit turned out better if I used the knife to mark the inside and outside corners, then connected them with the straight edge.
With a funky pattern like this, you’re shooting more for a close match on the miters; it’s very difficult to get an exact pattern match. I was happy with the results. Glue them in using Titebond liquid hide glue. It is urea based, not water based, meaning it won’t swell the inlay and make it warp. Put a straight piece of wood with painters tape on top and clamp it down to hold everything flat.
On the two long sides you’ll need to splice a small strip of veneer in to get the length we need. This is a good place for a scarf joint. The pattern lends well to it as well. Cut a line along the slope of one of the shapes, match it to the other piece, glue in tight for an almost invisible seam.
You can barely tell this was a joint
Splines getting glued in
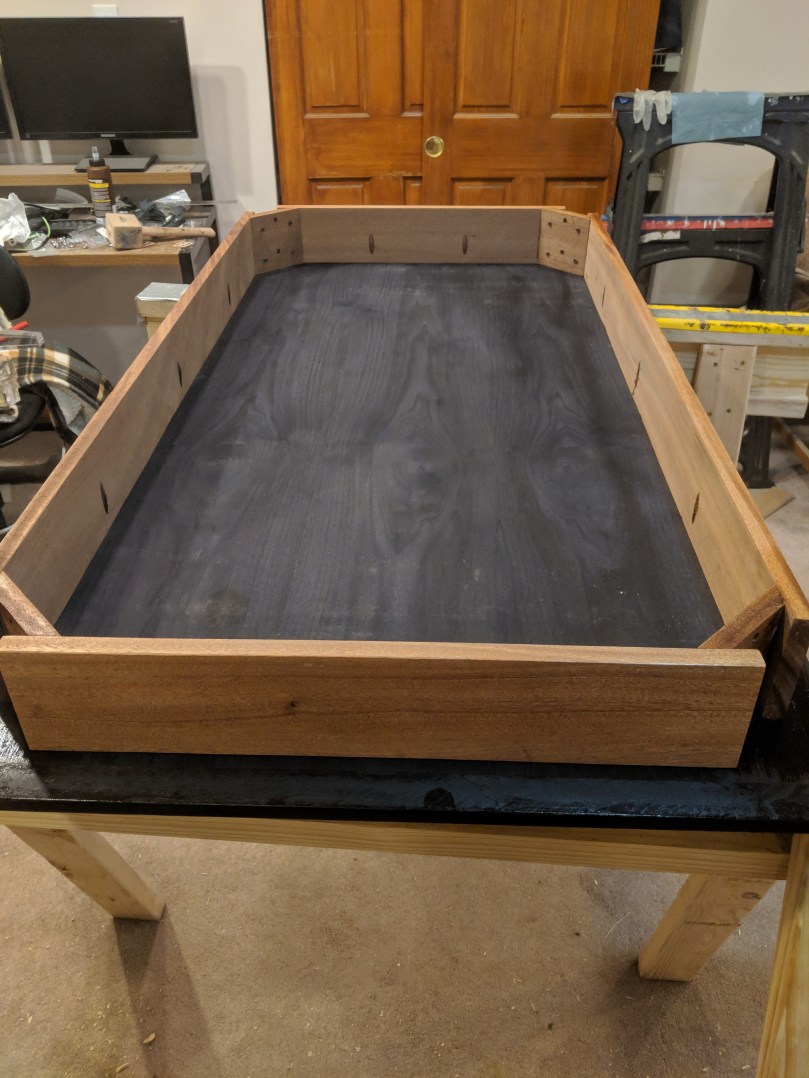
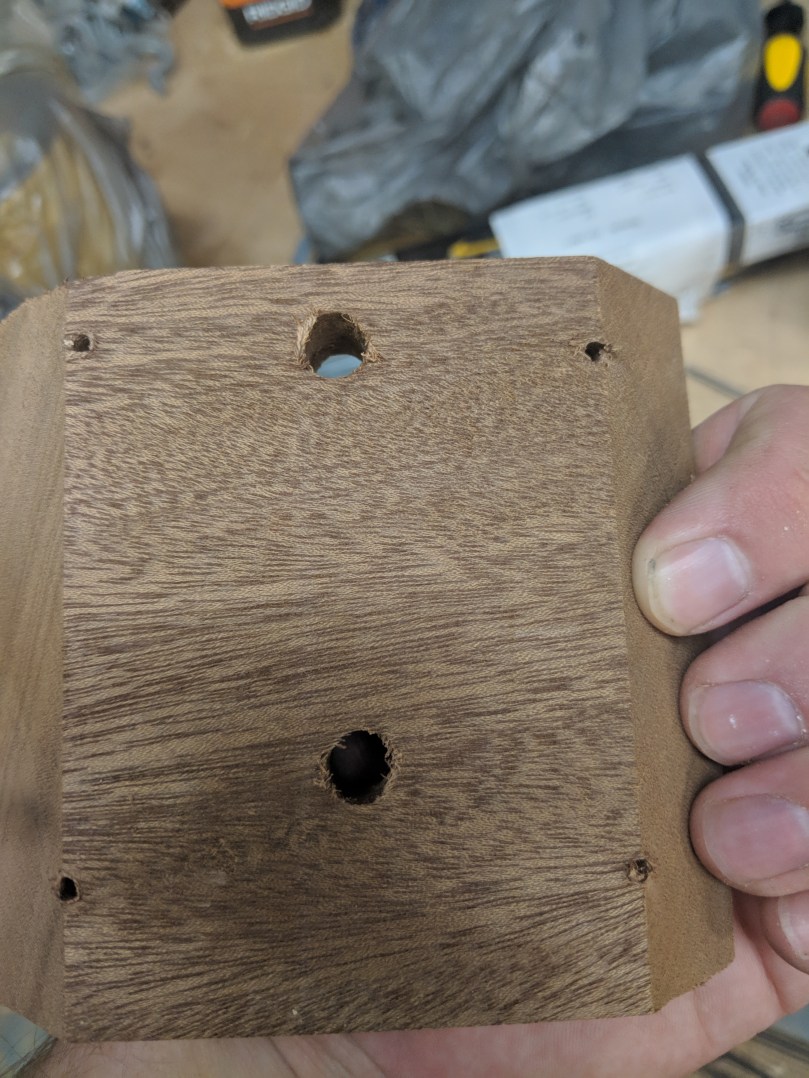
This is a good time to attach the frame. Use 1″ pocket screws. The guide on my kit says I can use 1.25″ but I found they almost punch through.
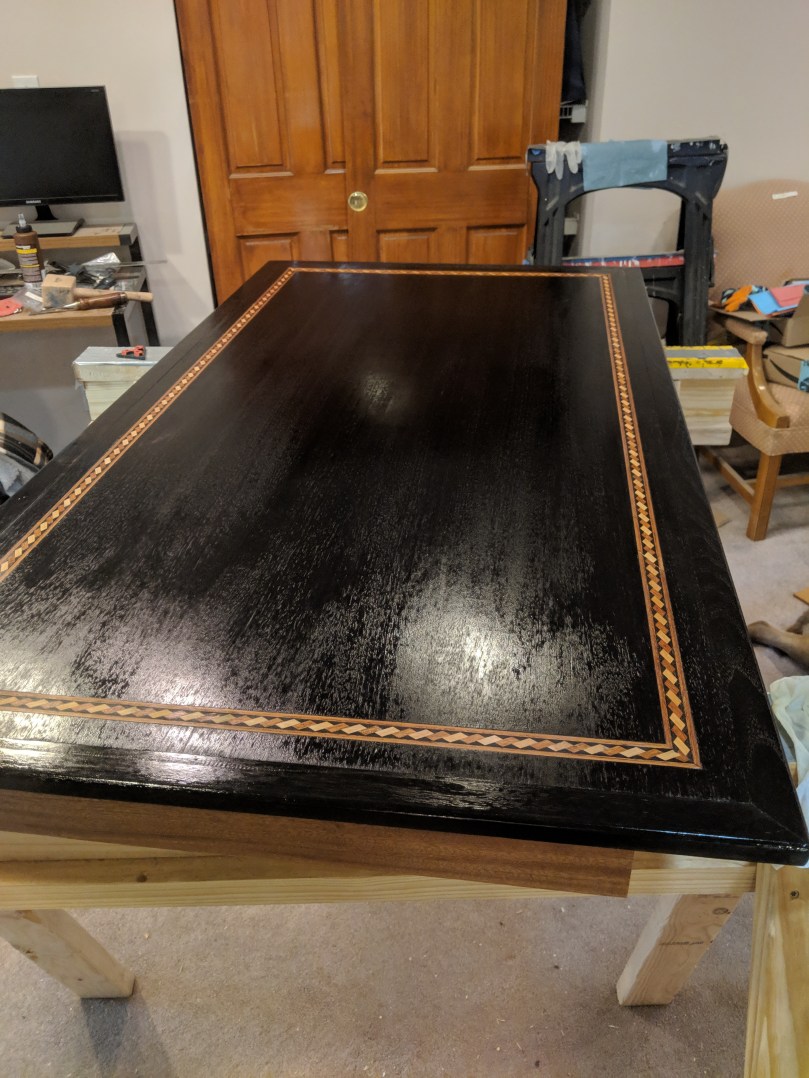
Sand, very lightly, with 220 by hand to remove the router marks. Then apply topcoat as usual. I did 3-4 coats of General Finishes Arm-r-Seal in Semi-gloss.
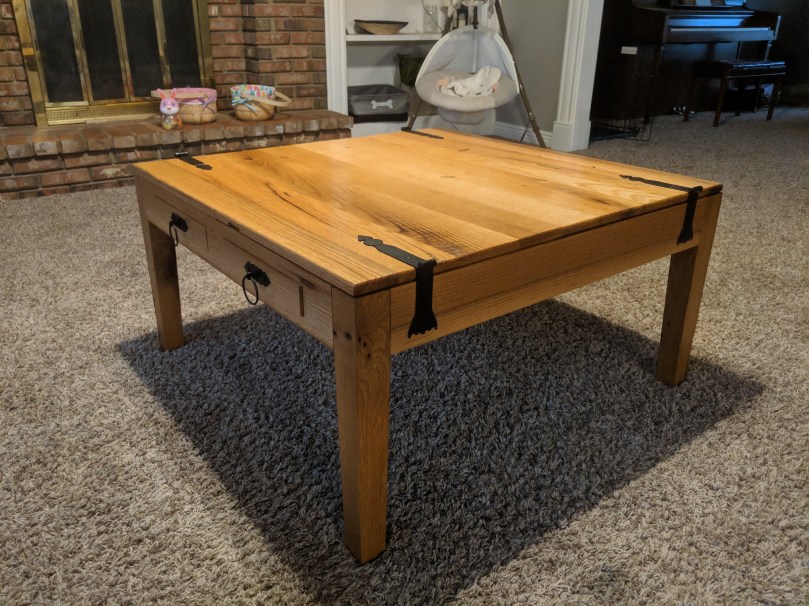
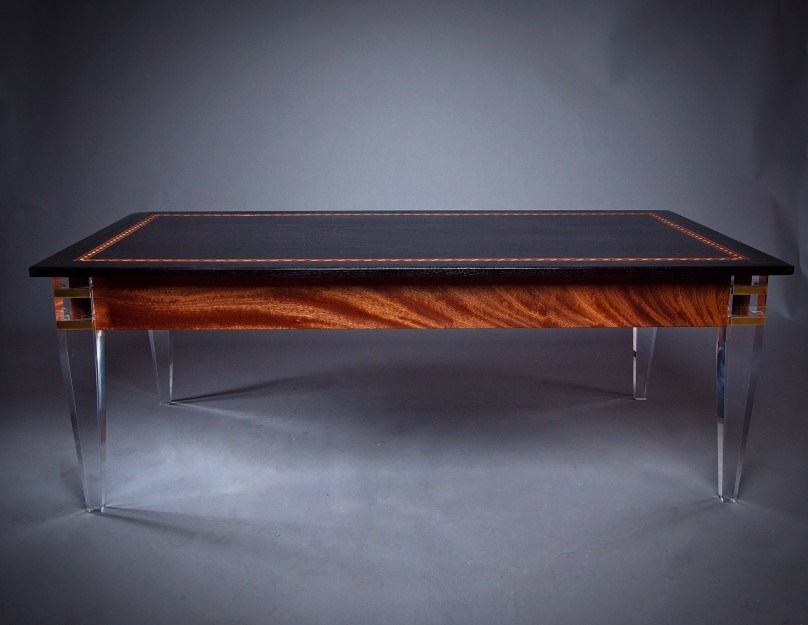
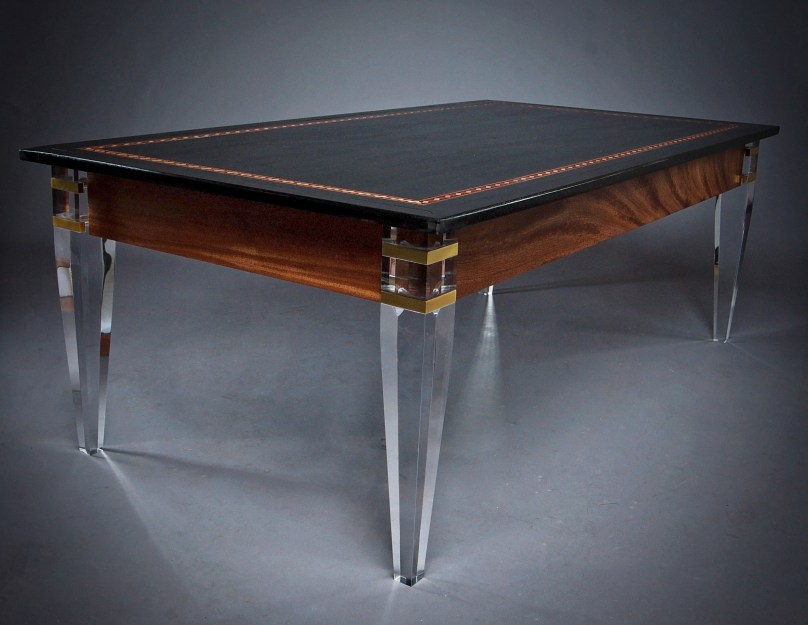
If you’ve been following my blog, you likely saw my post a few months back about the collaboration I did with Osborne Woodworking on their new acrylic leg line. If you didn’t, here’s a link!
They’ve asked me to do another write up, and I am incredibly thrilled to do so! In the interest of unbiased disclosure, I am making $0 on this project. Osborne provides me with the legs and inlay, but the table is going to a friend’s home. The friend paid only for the additional materials, and I make nothing for my time!
Now that we’ve gotten THAT out of the way, let’s talk about the project. Osborne asked me if I could incorporate inlay strips into a project, and I requested these acrylic legs as well; I’d had a design for those legs marinading in my mind, and I thought these inlay strips would be a perfect fit.
This is the table that was my beginning inspiration. There really aren’t a lot of examples of acrylic legged coffee tables out there. What I liked about this table was the way it uses the acrylic legs to elevate the beautiful wood and granite on top.
Credit: Allan-Knight Showroom
Now, I have no idea how to cut or process granite. And while I COULD get zebrawood, it seemed a little busy, especially with the brass that would be on my table legs and the inlay on top. Instead, I opted to use African Mahogany for the aprons and ebonized walnut (plywood and lumber framed) for the top.
I’ll post the final measured drawings at the end of the next post! I want to emphasize though that, unlike the last acrylic project, this project requires a bit more lumber processing. The apron height needed to be four inches in order for the threaded rods to line up on the legs, and you won’t be able to find 1x stock in four inch widths. Instead, you’ll need to rip the lumber with a table saw, circular saw, or even a hand saw.
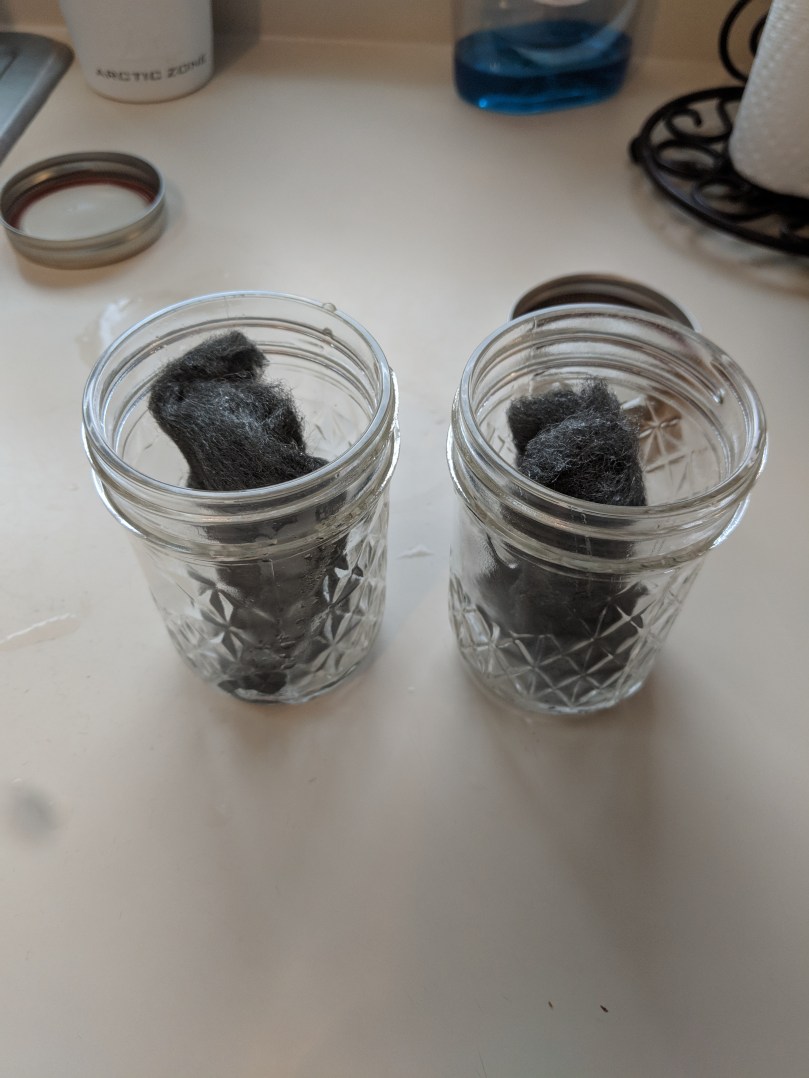
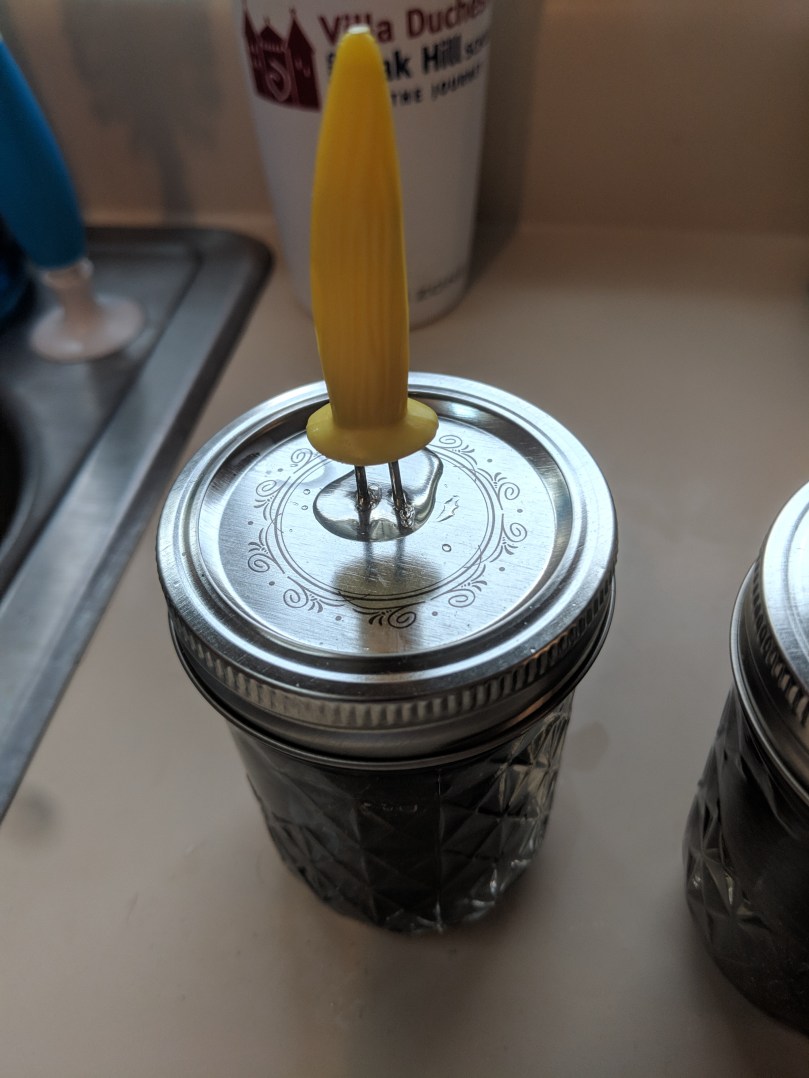
Before you do ANY cutting though, we need to prep the ebonizer. It sounds ominous, but it’s super simple. Take some 0000 steel wool, rinse it with dish soap and water to remove the rust inhibitor. We want rust! Then put it in a jar with some normal white vinegar and let it sit for a week. By doing this now, we make sure they ebonizer is ready once we need it; more to come in the next post!
0000 Steel wool, washed and ready to corrodeDIB Woodworking, proudly sponsored by Heinz…well, not really. It’s what I had. I’m sure any 5% vinegar will do. Foodies, restrain yourself from using cider or wine vinegar!The chemical reaction creates gas, make sure to add a few holes. Pro tip: corn holders are the best for poking baking potatoes too!Let this sit for a week, then strain through a coffee filter and store.
I was able to build the entire table frame using just two boards of mahogany. Both boards were about 12 ft long and about 5 inches wide. Rip them both to 4.25 inches. In my case, the mahogany was only available in S4S at about $5 per board foot. It was pretty darn straight, but I jointed and planed it down to about 3/4″ thickness before ripping to the final 4″ dimension. The customer’s couch was 78″ long, which meant the coffee table should be about 52″ long. I knew I wanted an inch overhang on each side of the legs, meaning the frame should be 50″ long overall. Subtract out 5″ to account for the combined thickness of two legs, and you get a 45″ apron on each long side. Cut that from the mahogany.
The width of the table was a bit more subjective. I looked at a few examples available online, and most were around 60% as wide as they were long. That seemed a little wide for me, so I opted for 28″. It’s completely arbitrary within the confines of what you think looks best. Subtract 2″ overhang, 5″ for legs, and you arrive at 21″ aprons on each of the short sides.
Mahogany aprons (left and top center) and mahogany corner brackets (bottom center)
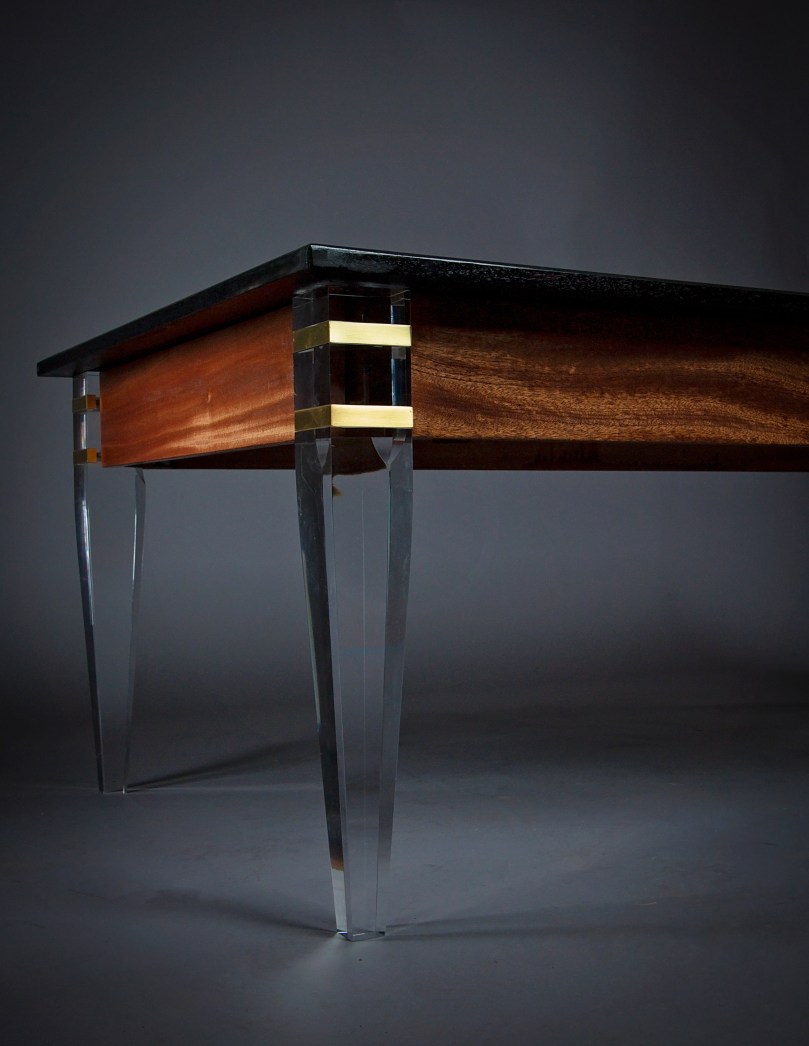
The legs attach to the aprons using corner brackets. Rockler sells these, pre-made, in galvanized steel. For almost any other application that needed corner brackets, I’d buy those in a heartbeat. Since the legs are clear acrylic, though, I don’t want the galvanized steel to be visible when you are looking at the table. That means creating your own corner brackets.
Note: This is by far the most complex part of the project. If you lack the tools, or are simply uneasy about it, I think the Rockler brackets would likely work fine with very little impact on the overall look.
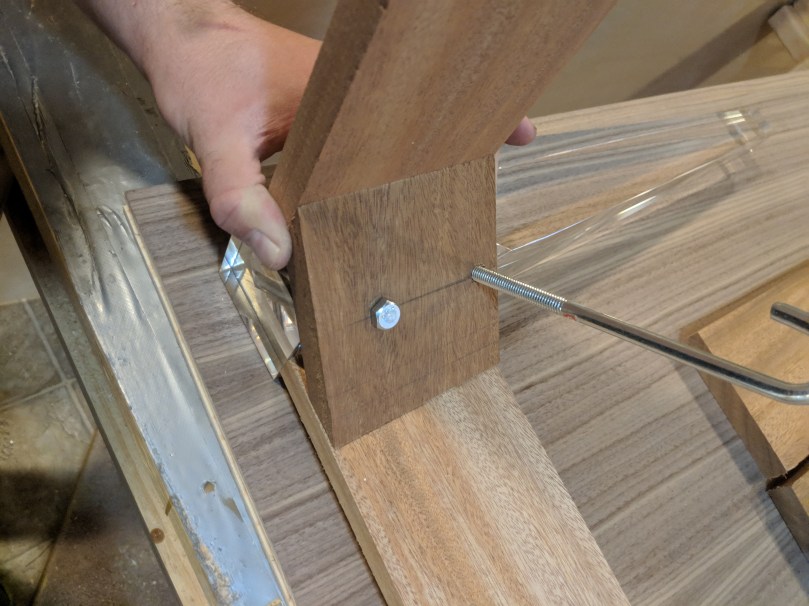
The brackets need to accomplish two things: 1) they need to give the legs a firm place to attach and 2) they need to be firmly attached to each adjacent apron to secure the entire frame together. This means putting a 45 degree miter on each edge of the bracket and putting two holes in the center for the bolts to attach.
I wanted the aprons to align just behind the end of the brass band on each side. It required a decent amount of geometry (hello Pythagoras and 64ths of an inch!) to make sure I got everything where I wanted it to be. To save you the trouble, all you need to know is this: the back end of the bracket (the long face, where the miter points are) needs to be about 5.5″ long to accomplish this. I’ll put the final dimensions in the plan, but my wood came in right at 11/16ths thick instead of a full 3/4″ which is why I’m saying ABOUT 5.5″. You could do this on a miter saw, but using the miter sled on your table saw will give you much better results; less slop.
The holes in the center of the bracket need to be 1.25″ and 3.5″ from the top, respectively. The bolts are 5/16″ thick, so I went with 3/8″ holes. The extra 1/16th gives us a bit of wiggle room. If you have a drill press, make sure the table is square and drill away. If you don’t, you’ll need to use a drill guide. It’s essential that they be square and plumb, otherwise the miters won’t contact the aprons correctly.
Test the fit. You want the corner bracket flush to the top of the leg, and the miter sitting flush against the apron. These were my test bolts, the real bolts are less random.Tops completely flush
Using a hand drill, make 4 small pilot holes, one inch off each side. You want these to angle the opposite direction of the miter so that the screws will enter the aprons at 90 degrees.
Now you need to create the rods that will attach everything together. I couldn’t find any pre-cut 5/16″ rods in the length we need, so I had to cut my own. I started by inserting the rod all the way, adding 3/4″ for the bracket, and then adding the length of the wingnut, washer, and lock nut. Overall, 2.5″ seems to be a good length. You’ll need to cut them by hand with a hacksaw and file the cut ends to fit. Tip: thread a wingnut on before you cut the rod, then twist the wingnut so that it goes over the threads you just cut. Most of the time, that corrects the threading.
Do a test fit on everything. The brackets may feel a little wobbly; mine did. Two things will help with that. First, we’re going to use glue on the miters. Second, the frame will be attached to the top as well. That should keep everything snug.
I chose to use hide glue for this project for two reasons: 1) I could easily undo it with water if I needed to fix any of the brackets and 2) it’s urea based, not water based, so it won’t cause warping or waves in the inlay we use later. If the idea of a cow hide based glue rubs you the wrong way, you can use regular wood glue; just make sure you fit everything really well first. I’ll address the inlay in the next post.
Drill small pilot holes into the apron being careful not to go through the finished side, glue, and then screw everything together. 1.25″ kreg screws were just right. I also had good results with 1.5″ #8 screws. Just be careful not to over drive them.
Add some pocket screws on the sides. I know, I know: I’ve been a very vocal critic of Kreg screws before, but this is really the perfect application for them. We want a hidden fastener that will be going into a dimensionally stable top (plywood) and will have no shearing force exerted, only pulling force. All three of those things add up to pocket screws!
Placement is relatively arbitrary. I chose 10″ off each leg on the long sides and one in the center. On the short sides, I did 7″ off each side. Completely arbitrary.
Check for square by measuring the diagonals before the glue dries. Let it sit. We will apply the finish later, once the top is attached and the legs (which will dissolve if the finish touches them) are removed!
Wow, it’s been a while since I’ve written anything here. I guess having a baby will do that to you? Slowly, but surely, I’ve been getting some work done, and I wanted to write a quick post on a new regimen I tried on some white oak that I really like. If you’re looking to accentuate the natural character of the wood, and not stain it, this is a great process:
Sand the entire piece to 120, then 220 grit with an orbital sander
Coat with Danish oil in “natural” finish. Follow the directions carefully, and make sure to rub out all the excess so it dries properly.
Let it sit for 3 days to fully dry.
Coat with two coats of shellac sanding sealer, sanding at 220 in between.
Top coat with your favorite wipe-on finish. I like General Finishes Arm-R-Seal or Minwax wipe-on poly.
That’s it! A great, natural finish that is durable as well. Here’s how it looks on a finished product!
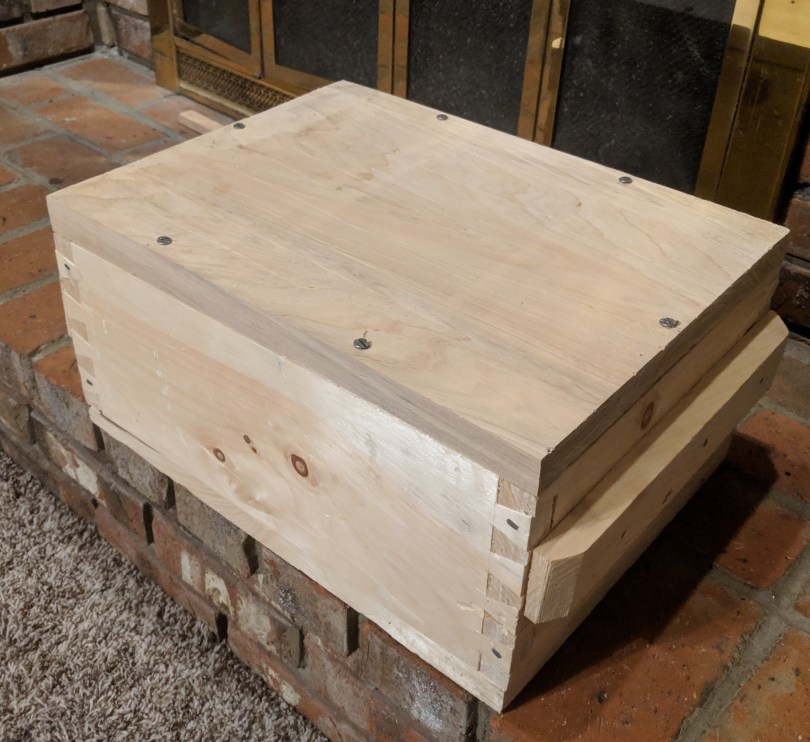
A while back, my brother offhandedly asked me about building him a replica ammunition box for his Civil War reenactments. At the time, he sent me a link to a YouTube video and a written tutorial on how to make these by hand. Here are some pictures of munitions boxes from that period:
And here’s a link to the article I’m referencing for reproducing these.
Here’s a link to a site that sells reproduction crates.
The first thing I want to emphasize is that this article was a great guide for starting out, and the author admits his goal was to create a pseudo-ammo crate that was really double stacked to help hide his modern accouterments. 100% historical reproduction was not his goal. But, it is mine!
Right off the bat, I noticed a few issues with the way the box was built. First, the author mentions that the dimensions for the box should be 14.75″x 10.75″x 6.38″, but that 1×6 stock could be used with only minimal loss in height. Presumably, the author was assuming a 1×6 was truly 6″ tall; as those who follow this blog know, that’s simply not the case these days! A 1×6 board is actually only 5.5″ wide, meaning this replica box would be a full 7/8″ too short. The first thing you need to know about Civil War reenactors is that they’re (more often than not) sticklers for accuracy; I couldn’t see that large of a difference being acceptable.
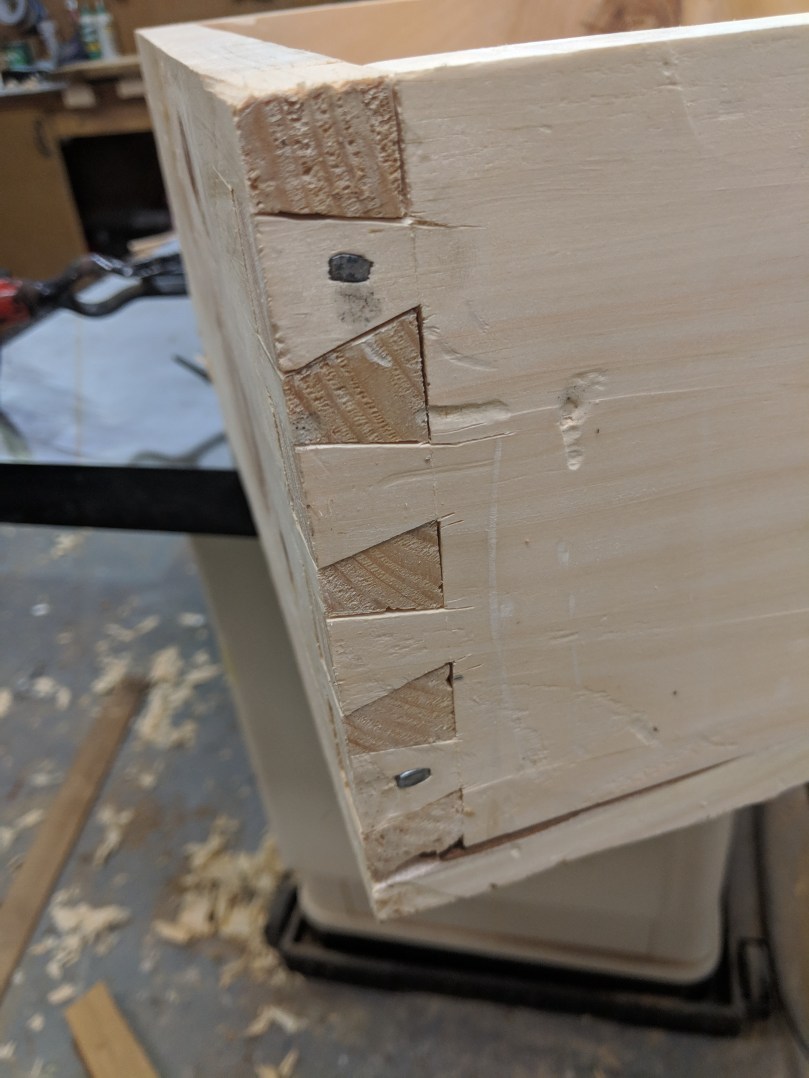
The second issue I noticed was that the author mentioned the sides needed to be dovetailed together, but then proceeded to use what I guess would be called large finger joints? This is an important distinction, because while a finger joint can be strong in modern joinery, it’s only strong because of the large amount of glue area. Modern glues are very water resistant, but Civil War era glues would have been made from cow hide, and water soluble. Meanwhile, the historically accurate dovetail joint gets all of its strength from geometry and does not rely on glue at all! You can see the trapezoidal shape of the dovetail in the first picture above where the wood has chipped off.
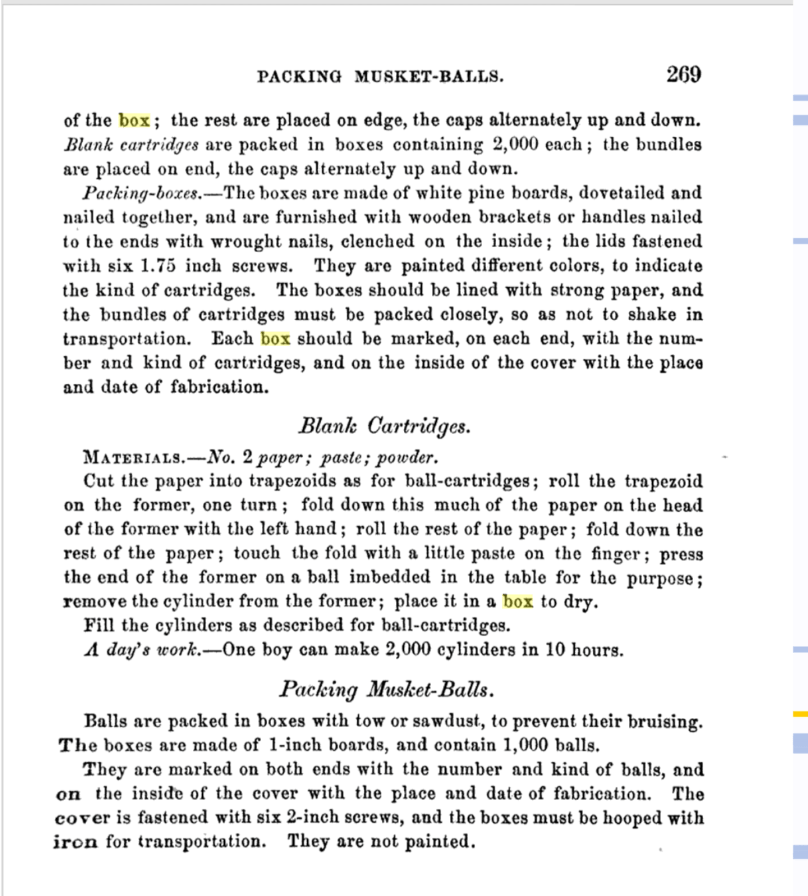
Both the tutorial article and the merchant site both reference the Union Army Ordinance Manuals from the time. So, I figured that’s a good place to start. Here’s a link to the full text on Google Books, but I’ve posted some pictures here too of the relevant sections:
There’s a lot of really great information in these two images, but let’s just break down the essentials:
White pine boards
Dimensions for the .58 Caliber box are 14.75″x 10.75″x 6.38″ (6.38 is that same as 6 and 3/8ths, rounded up)
Should contain 1,000 cartridges (this is from the sentence on the previous page I had to crop out)
Dovetailed and nailed
Wooden handles nailed and clenched
Lids (plural, I take this to mean top and bottom) attached with 1.75″ screws.
In the interest of full historical recreation, I also opted to do this using only hand tools. Even my hand tools are certainly more advanced than what they had at the time (they would have used wooden bodied planes, for example), but they’re still the same in form and function.
Let’s start with the dimensions. The article’s instructions say to cut each piece of wood to those dimensions. However, I found references to the fact that these would have been interior measurements, not exterior. CS Cutlery mentions this in their dimensions (though theirs, curiously, still don’t match the manual…). As a woodworker, these dimensions being interior measurements makes a lot of sense to me. The lumber they were working with was by no means universal in any way, shape, or form. Each piece would have been individually surfaced, by hand. As such, there would be no way to know that each box would contain the same amount of ammo if exterior dimensions were given as each board would be a different thickness.
I was able to double check this using the dimensions for the 10 cartridge bundle listed in the manual as well. Each bundle would be approximately 8.67 cubic inches, for a total volume of 867.1 cubic inches of volume per 1,000 cartridges. A box with exterior dimensions as listed above, with side panels of 0.75″ thick (about the thinnest you could reasonably go) would have interior dimensions of 13.25″ x 9.25″ x 4.88″. This gives only 598.11 cubic inches, whereas the interior measurement method would give 1011.63 cubic inches; plenty of room for 1,000 cartridges and paper lining.
Enough of the historical referencing for now, how about some woodworking?
I chose to start with rough cut lumber, since it seemed a bit liked cheating to tout doing this with “hand tools only” if I had it surfaced before I bought it. This board is about 12.5″ wide, 4/4 rough, and 12′ long white pine. If you aren’t a stickler, you can get pre-surfaced pine at any home improvement center; this would simply be 1x material. I doubt Home Depot or Lowes would carry it in this width though, so go to your local lumber yard like I did (thanks WunderWoods!). What you get at HD would be SPF which means ‘Spruce, Pine, or Fir.” I’ll let your degree of accuracy dictate whether or not you care about that.
Big bonus of using Wunderwoods? St. Louis had a major Union arsenal during the war. All of the white pine they used would have come from this area. Since I know Wunderwoods harvested this locally, is it the progeny of a tree that was at one time cut down during the civil war to also make ammo boxes? I’d like to think so!
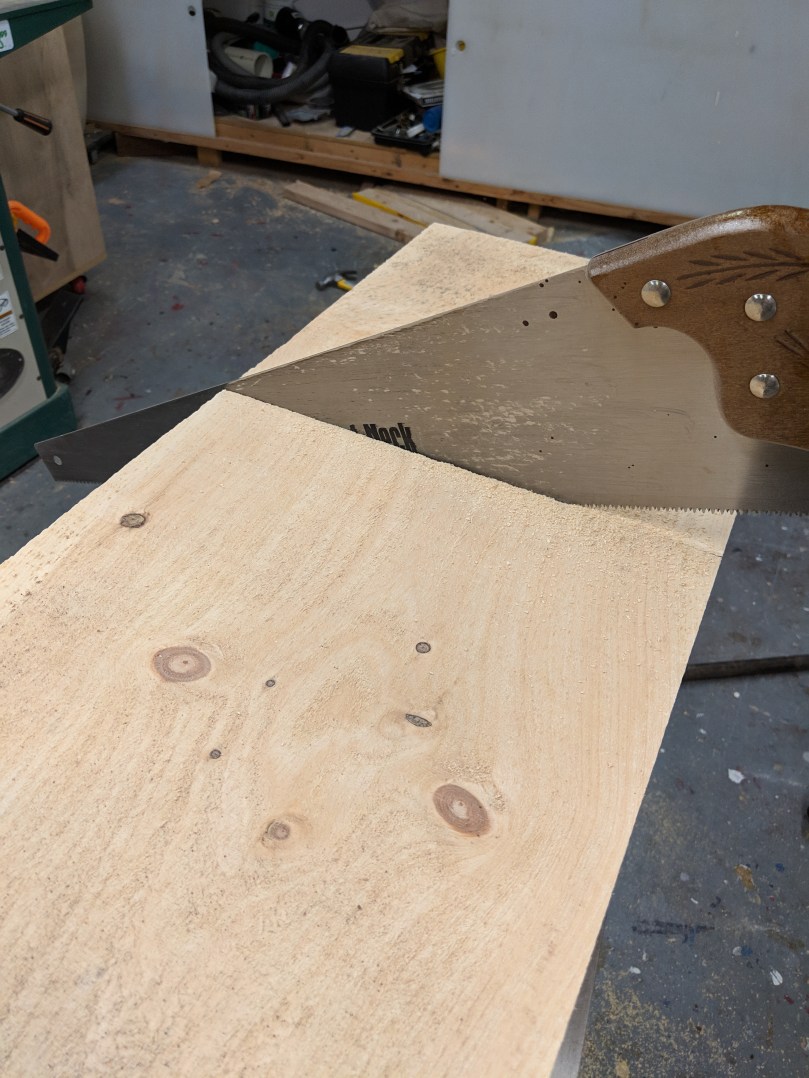
On a board of rough cut lumber, no matter how good your lumber yard is, there’s no good straight reference edges.
You can do all the dimensioning of these boards with four tool(s): A crosscut saw (this is the one I have), a rip saw, a #5 plane (#4 would also work), and a set of chisels. If you get a two sided Japanese Ryoba saw, you can actually get away with just one saw! A dedicated, Western style rip saw is almost impossible to find these days unless you want to spend at least $80. Antique malls and Craigslist are your best bet, though you’ll need to sharpen it (which is a whole ordeal on it’s own)
I’m going to cross-cut everything at least two inches longer than I need to account for more waste when I square everything up. Since we’re working off interior dimensions, add 1.5″ to that to account for the width of the sides (we’re shooting for about 3/4″ thick sides). Then add 2 inches to that to account for waste. This 12 ft board came up JUST short of doing the box on it’s own, if so make sure you buy more like 14 total feet. Coincidentally, 12.5″ is almost dead on the width we need for the top and bottom, so if you can get that width, do! If you can’t, you’ll need to edge glue two pieces together.
Use a square to make a line off one edge as a saw guide, knowing that it won’t be your final cut
After you get the boards knocked down, you need to get to the proper height; in this case, 6.38″. You COULD try to go right to rip cutting, but you still don’t really have a reference edge, so it might not turn out well. Instead, I put the boards in my vice and plane on edge dead flat and approximately square to the face. That gives you an edge from which you can measure off parallel lines.
My phone’s camera was on the fritz, so I lost a few pictures; you should be able to follow just via text. Off that edge you just planed, mark a line the length of the board, parallel and 6.5″ from the flat edge. Use your rip saw to cut just on the outside of that line; that will leave room for final planing.
Now that you’re almost at the width you need, you’ll need to surface both faces flat and parallel to each other. If you have a woodworkers bench, you can use the various clamps and vices on there to hold the board. I just have a regular work bench, so I needed to make bench hooks to help hold the piece while I plane it.
Here’s the process I followed:
Plane one face, checking for flat with a ruler or, in my case, a perfectly flat surface like a cast iron table saw top. Make sure it’s also square to that first edge you planed.
Plane the other edge square to that face, making sure not to go past the 6.38″ line.
Plane the final face, using both edges to check for square. If your edges are square to the first face, and the second face is square to the edges, both faces will be parallel.
After surfacing your first board, repeat with the other three, using the first as a reference for thickness.
This is maybe a quarter of the shavings I made
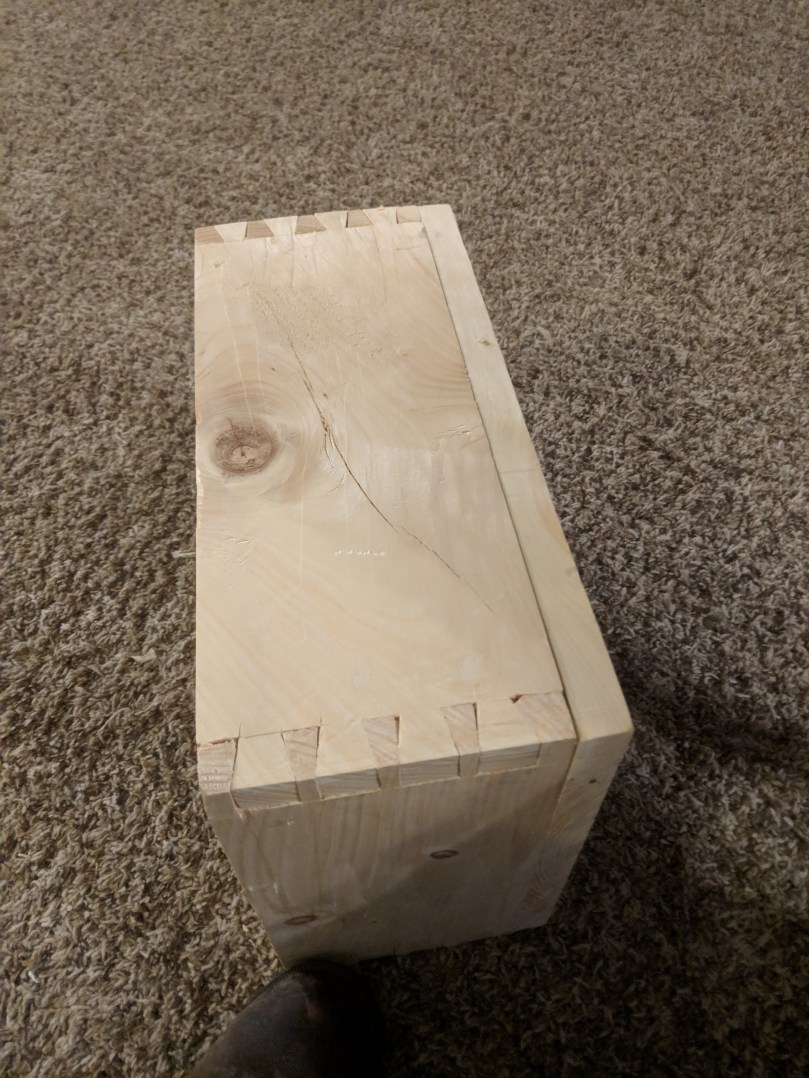
Now we need to know how thick our sides will be so we can measure the final length of the boards. The best way to do this is put each pair of opposite sides together, measure the total thickness, and then add this to the adjacent length (width) depending on which set you’re measuring. In this picture, my long sides measure about 1 and 13/16ths thick. So, my short sides (10.75″ interior width) need to actually be 10.75+1 & 13/16th long. This is to account for the dovetails (this will make more sense soon).
Using your square, cut a perpendicular line off one side of each board. Then, measure the length you need off that edge, and crosscut the other side to your final dimensions. Use your hand plane to get the width down to 6.38″ if you haven’t done so already.
I use the “dividers” method for laying out my dovetails. Here’s a video of that process for you.
I’m gonna level with you; I’m not great at dovetails, at least not great enough to pretend I can instruct you how to do them. Here’s a video from Paul Sellers on how to make them. Here’s a link to an inexpensive dovetail saw. You can mark the dovetails using only a combination square, but a dovetail guide, marking wheel, and marking knife make this easier. I got all three as a kit from Woodcraft around Christmas for $25. The cut lines made by the knife and wheel help guide the saw blade.
Dovetails are difficult on hardwood. They’re really, really difficult on a soft wood like white pine. Don’t beat yourself up too much, I’m telling myself it adds to the historical character.
I found examples of munitions boxes from that period that had the dovetail “tails” on either the long or short boards. I chose the long boards, the geometry of the tail providing a strong force to keep the box from pulling apart if one were to drag it by the handles.
Here’s a pic of the rough fit for the box bottom/lid. Mine was the exact width needed by pure chance. Surface this just like you did the other boards.
Time to add the screws. The manual specifies 6 screws per lid. Presumably, both the top and bottom lid would have been screwed on, only to be opened at the battlefield or camp. There didn’t need to be a mechanism for closing and reopening these boxes frequently.
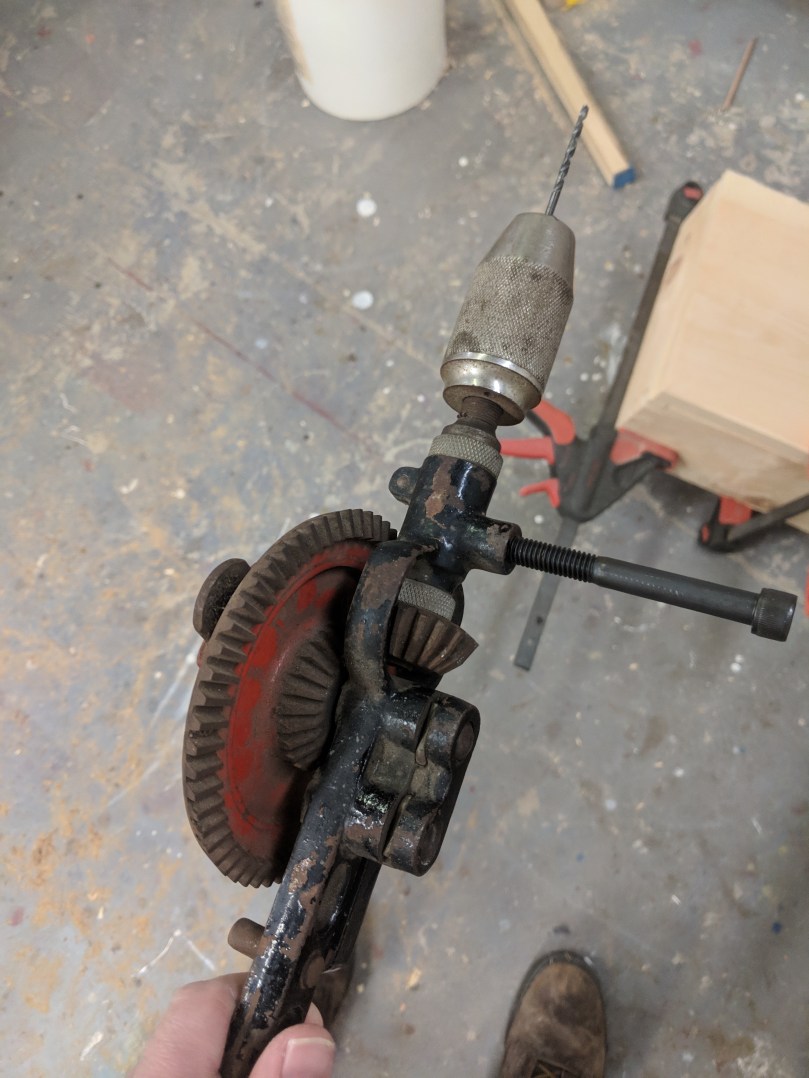
For the sake of “hand tools only” I went and bought this old egg beater drill off Facebook Marketplace. It was about $15 and, though it didn’t come with bits, readily accepted a normal brad tip drill bit. A brace and bit setup would likely be more accurate, but my brace only has auger bits, which would be too large.
The screws used at the time would have been slotted, or “flat head” screws, since the Phillips head wasn’t invented until around the 1930s. While they COULD have been brass (as some use in their box construction) I find it unlikely, given the added expense, and whatever you find at your hardware store will likely be zinc coated. The only option I could find was Kennedy Hardware. They carry flat head, slotted, steel wood screws in a bunch of different lengths. Unfortunately, not in 1.75″ (when I was looking). So, I settled for 1.5″; will the reenactors forgive me? Too early to know. (Note: They have No. 12 screws in 1.75″, but those are almost 1/4 inch in diameter, which I was sure was far too large). Before you screw anything together, measure the diagonals. If they’re equal, all your corners are square.
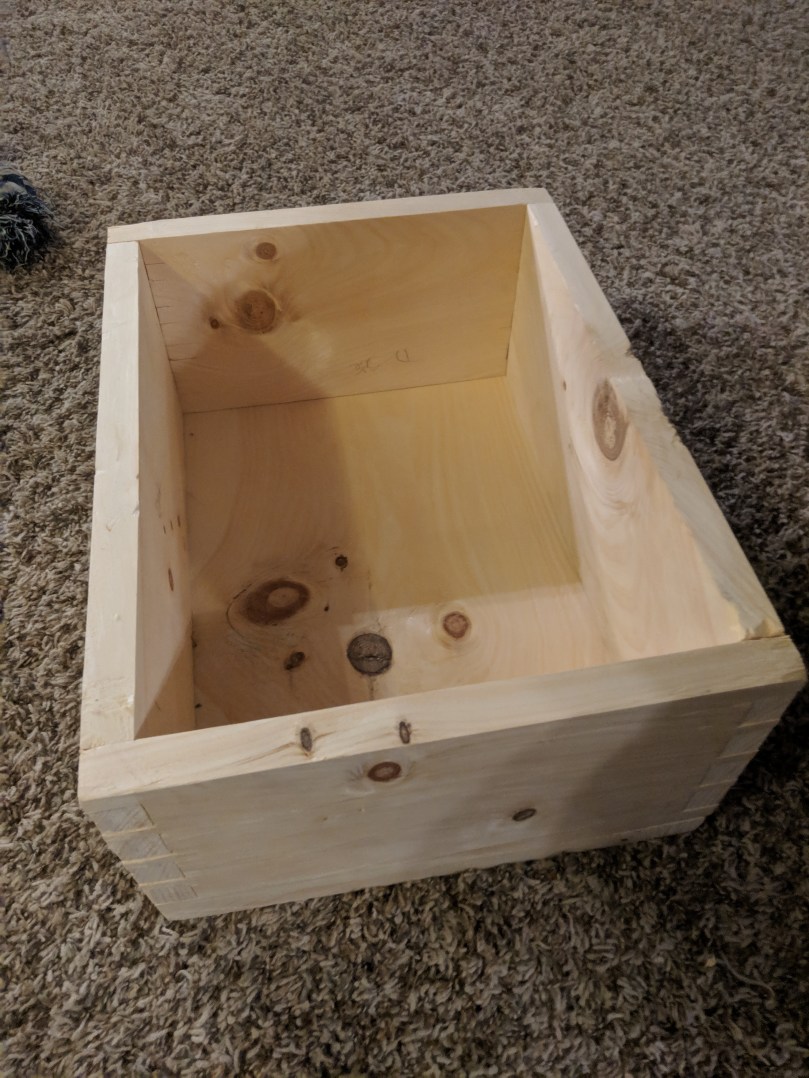
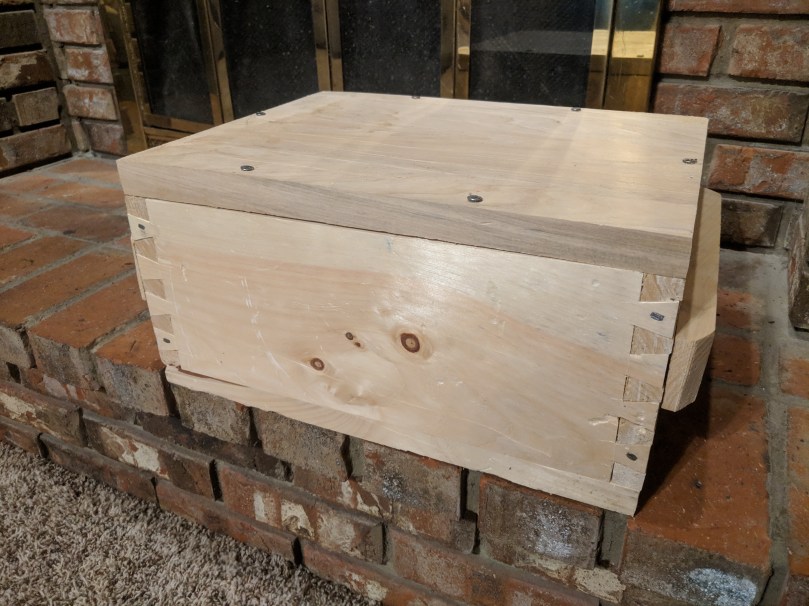
Here’s a look at everything with the bottom attached. Since I am making this as accurate as possible, I will probably ship it to my brother with the top attached too. I’ll also include two little strips of wood and some cut nails so my brother can put them on the inside of the lid, if he likes, to make it more usable for storage during reenactments (see the plans above). Not accurate, but more practical; his call in the end. ATTACHING THE TOP LID SHOULD BE THE LAST STEP YOU DO.
Some gaps on the dovetails, but just as strong. Once painted, you’ll never be able to tell.
The ordinance manual also specifies the dovetails should be nailed. The way a dovetail works, it is very strong in one direction, but separates easily in the other. In the case of this box, it would be very hard to pull the short sides off the box, but relatively easy to pull the long sides off. By driving cut nails into the “tails” of the joint, we ensure the tails will not pull out. Modern wire nails would do a very poor job accomplishing this, as they have very little gripping power. But cut nails are wedge shaped, which compresses the wood as the nail is driven. Here’s an excellent video explaining the advantages of cut nails. Make sure to drill a small pilot hole with these.
I’m going off the original image, above, for my plans. In that image there are handles on the sides, but no rope in the handles. The ordinance manual doesn’t specify rope; an omission that I think points very strongly toward there not being any, given the specificity in all other aspects.
Use the scraps you’ve cut off to make these handles. By looking at the image we can see the handles are about 1/4 of the box height (call it 2 inches), as long as the side, and sit about 2 inches from the top. Use your plane to taper the ends down, then drive some 2 inch long cut nails (3 total) into the handle and through the box. I chose to drill a small pilot hole to aid in this, and prevent the wood from splitting. I purchased mine from House of Antique Hardware. Again, get the plain steel ones, not the galvanized ones.
After the nails are driven through, there should be about 3/8 inch that pokes through the inside. This is where we “clench” the nails. All that means is you hammer the tip sideways until it’s flat. Now that handle will never come off.
Attach the top and that’s it, folks! The manual specifies different paint colors depending on the ammo. This box would get an olive green paint. The manual even includes mixing instructions, but I’d urge caution given the use of turpentine and boiled linseed oil. Premixed, canned paint was not invented until 1866; if you decide to purchase a paint, rather than mix your own, powdered milk paint (not pre-made) would be period appropriate. I’m leaving it raw for my brother to decide what he wants to do with it.
I hope this is a valuable resource for all the reenactors and woodworkers out there! If you have questions on building the box, please feel free to email me. If there’s anything you think I did wrong in trying to reproduce this box, please let me know!
If you really want a historically accurate box like this, but don’t have the desire to build one, shoot me an email and we can talk about commissioning a few pieces. dibwoodworkingllc@gmail.com
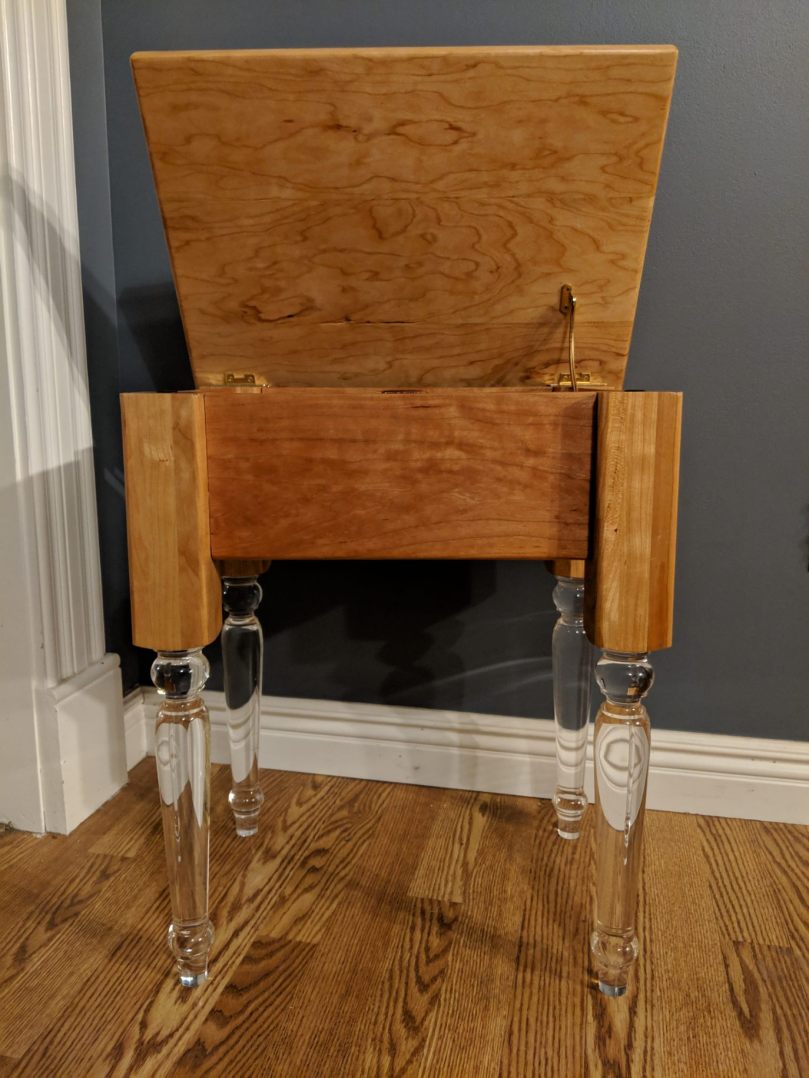
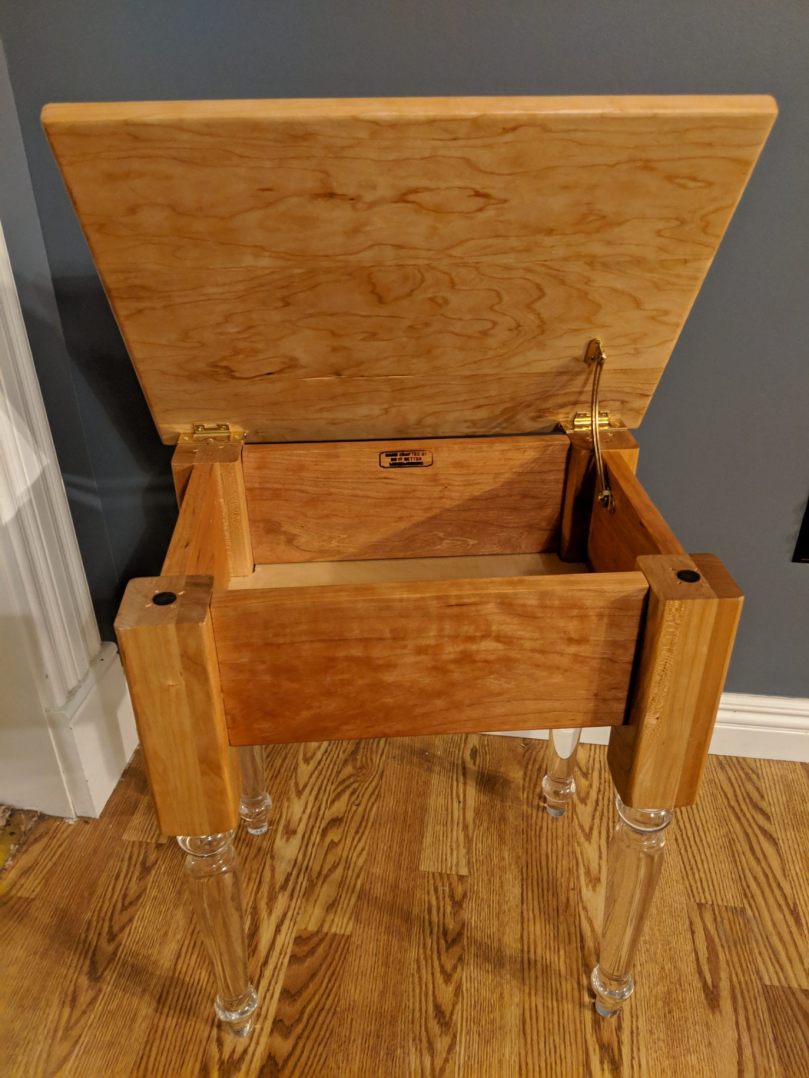
About a month ago, I was asked by Osborne Wood Products to create a step-by-step tutorial for one of their new products: acrylic table legs.
Naturally, I was very excited to take on the task! They provided me with the legs free of charge, but I received no other compensation. I ended up finding some friends who needed a side table for their living room, and we agreed that I’d build the table for just the cost of the remaining materials.
I had a few goals in mind for this build:
In the spirit of DIB, I wanted to make this a project that could be done by someone who was moving up from basic DIY skills.
The acrylic legs were going to be a bit unorthodox, so I wanted the design of the table to draw on the legs in some ways to bring everything together.
It needed to be functional for my friend’s living room. This meant a lid that opened rather than a draw. The additional advantage is that this makes it much more DIB friendly; drawers can be a tough thing to master.
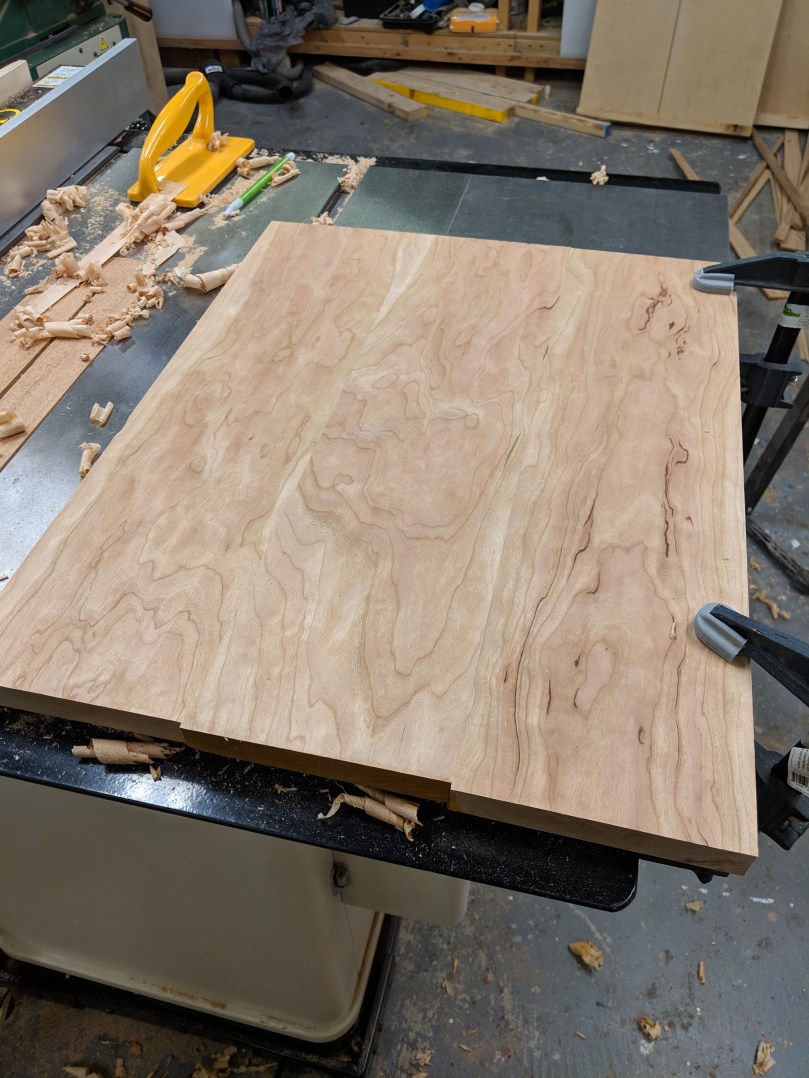
I opted to do the sides (aprons) of the table using what would be called “1×6″ stock, if you were to find it at a home improvement center. I don’t mean construction grade 1×6; these stores will carry craft grade hardwoods in this dimension, most likely red oak and maple. Since I can mill my own lumber, I just went ahead and bought some S2 cherry and milled it to 1×6 stock. In actuality, it’s 0.75″ thick and 5.5” wide. If you’re curious why this these dimensions are different than the label states, revisit my blog post here!
I would have LOVED to have used 1×8 material, because I think the proportions would have come out better. But I couldn’t find any hardwood stock that Home Depot or Lowes carried (and was affordable) in 1×8. Being able to mill to 1×8 isn’t a luxury most DIYers will have, so I stuck with what was common.
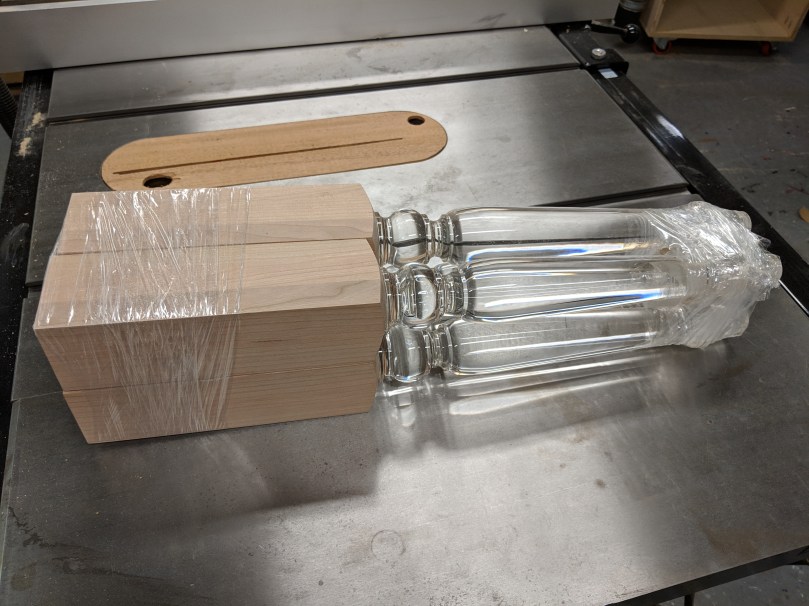
Three days after confirming with Osborne, the legs arrived in the mail.
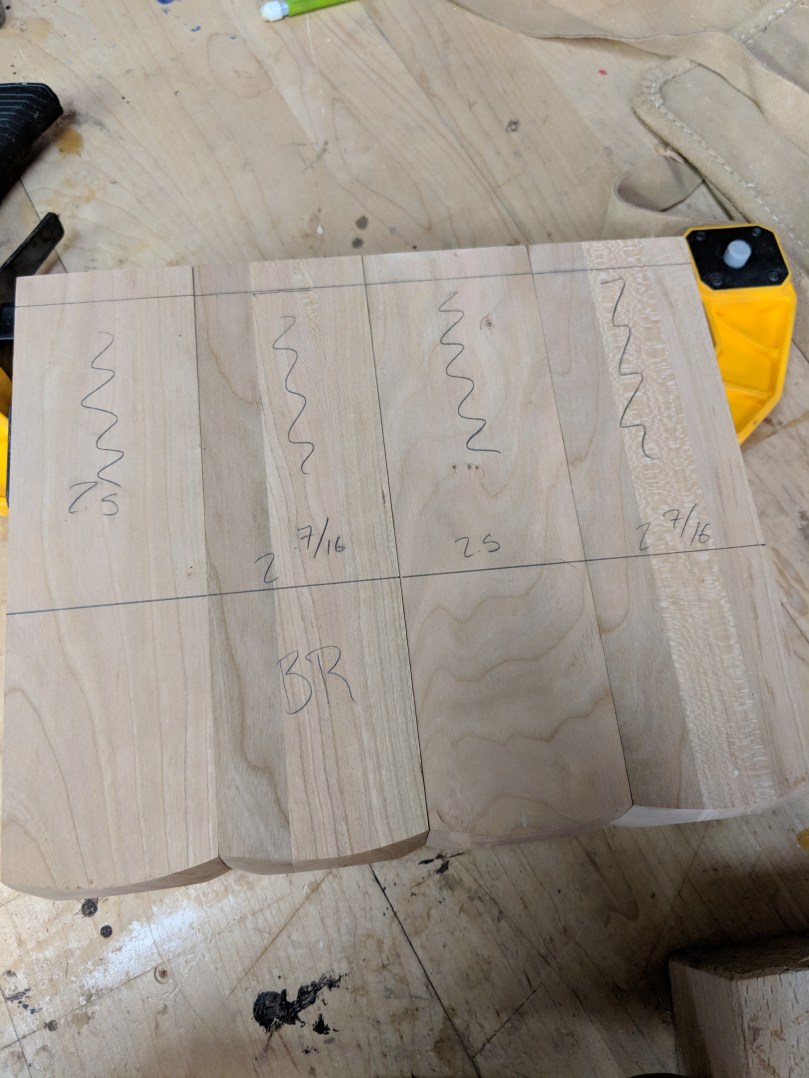
The first thing I did was take them out of their packaging and measure each one. They were all the same length, but there were some varying widths to the wooden parts, at most 1/16th of an inch different from the 2.5″ they were supposed to be. Not a huge deal, just important to know so we can adjust.
This is a good time to lay them out and figure out which legs will go where. I tried to match them so that the front and back legs would have similar widths. I mark them with a BL for back left, and a FR for front right.
I then made marks for each corner so I could keep reference (see the 1 and 2 marked on here.)
Side note: Those four little impressions must be from the machining process, like a lathe chuck. In hindsight, I should have removed them. What I’d recommend is using a miter saw or table saw to take about 1/16th off the end of each wooden block just to remove these.
Next, I cut the cherry boards down to the length I needed (see diagram). Remember, you have to add 0.75 inches on each end of the length to account for the tenons we’re going to cut. You can do this on your table saw, like I did. You can also use a miter saw, circular saw (of you use a carpenters square to keep you at a 90 degree cut) or even a hand saw if you’re careful enough.
As an added measure of safety, I measured the legs in adjacent pairs. By doing this, you essentially multiply the error of each individual leg by 2. Basically, it’s easier to notice a 1/16th difference between 2 combined legs than a 1/32nd inch difference on each. For every fraction of an inch this measures under 5″. add that to the length of the side that will connect those two legs. Ex: If FL and FR together measure 4 and 7/8ths inches across, then the front apron needs to actually be 12.5″ plus 1/8th inch variance (plus 1.5″ total for the tenons).
You always want to cut your mortises first. It’s much easier to make a tenon just slightly thick and then trim it to fit a mortise. Much harder to make the mortise narrow and widen to fit the tenon. I opted for a 3/8 inch thick tenon, which means we need a 3/8 width mortise. I also decided to leave 1/2 inch on the width of the board on each side as the “shoulders” for the tenon.
On each side, mark 1/2 inch down and 5 inches down. These are the lines where we want our mortise to stop. You’ll need to mark this line on all four sides of the legs since we’ll be referencing off them.
Side note: This is a good time to unscrew the acrylic legs. Not only are they cumbersome while we’re doing all this, but Osborne tells me that lacquer thinner will melt them, so they need to come off before we apply the finish anyway.
To do this on a router table, you’ll want to use a 3/8″ straight cutting bit. Use a square placed against the fence of your router table, and mark the edges of the bit on some pieces of tape so you know where to start and stop your cut. I use my calipers to make sure I’m as close as physically possible to being centered. It should be 1 and 1/16th from each side, or 1.0625. You can see on my calipers that I’m 0.0125 inches off. There’s no way I can make an adjustment that accurately.
Instead, what we do is run the piece through, flip it around, and then run it through the opposite direction. That guarantees that slot will be centered. This is also why we cut our tenons slightly thick and trim down; we’ll always end up with something slightly larger than a 3/8 mortise.
Start very shallow, maybe 1/8 inch. Slowly work your way up until you’ve reached 3/4″ in depth. It should look something like this:
The other way to do this is with hand tools, if you don’t have access to a dado stack on your saw. Here’s a blog post where I showed how to do that as well!
To cut the tenons, I decided to use the dado set on my table saw. This is essentially two 1/8 inch wide blades put next to each other. I could have done a 0.75″ thick dado cutter, but then I’d have to move down to 1/4 when I cut the grooves in the sides, and I’d rather just do one setup.
Anytime you are crosscutting (where the grain is perpendicular to the blade) on your table saw, you have to use a stop block on your fence. This keeps the wood from binding between the blade and the fence, which can cause a dangerous event called kickback.
Measure 3/4 inch off the stop block to the opposite edge of the blade, then set the height of the blade to just under 3/16ths of an inch. Use your miter gauge to cut out the tenon on a piece of scrap identical in thickness. Here’s a good video:
The tenon you’re left with will be square edged, but the mortise has rounded edges. Simply take a chisel or utility knife and knock the corners off your test piece.
Try the fit of your test piece. If it looks good, make all the tenon cuts.
If the top of the apron is perfectly flush with the top of the leg, and there are no caps along the joint, you’re set!
Again, here’s a link to the post where I show how to do this by hand. In that case, you’d use a 3/8″ chisel.
Now you need to make the groove for the bottom drawer that will fit in. I opted to use pre-finished plywood on 1/4 thickness. I think anything larger would be overkill. I made the cut with my dado blade, using a featherboard to hold everything flush (always keep the featherboard in front of the blade to avoid kickback.
You could just as easily do this with a router. If you were going to do this without either of those tools, it would be very difficult. You’d have to use a groove cutting hand plane, or you could mark the lines and hand chisel. This would be a good excuse to borrow a tool or find a shop that can cut this for you.
Now’s a good time to brand your piece, if you have one!
I decided to echo some of the round elements of the legs in the rest of the construction. That meant using a roundover bit on all the corners and the bottoms of the aprons.
Nice visualization of all the parts we’ve milled
Before you start gluing anything, you really need to mark your tenons and mortises to make sure you remember what goes where. I find it’s best to put them on the end of the tenon and inside the mortise, since they’d get sanded off if you put them on the outside.
Dry fit everything together and then measure for the plywood bottom. Remember to add about half an inch to the total length and width to account for the two, quarter inch deep groves on each side.
Note: To make this easier, don’t roundover the inside corner of the legs. It was really hard to get the rounded profile right, and it didn’t turn out as perfectly as it could have with a square corner.
Cut your plywood off the large sheet, leaving a little bit extra so you can give it a final, more accurate cut on your table saw. If you don’t have a table saw, just do the final dimensions with your circular saw; the groove can hide some of the imperfections.
I used a hand coping saw to cut the corners out. You could also use a scroll saw or powered jigsaw.
Dry fit once more to make sure it fits as you’d like.
Once all the pieces fit, set everything aside until we’re ready to sand.
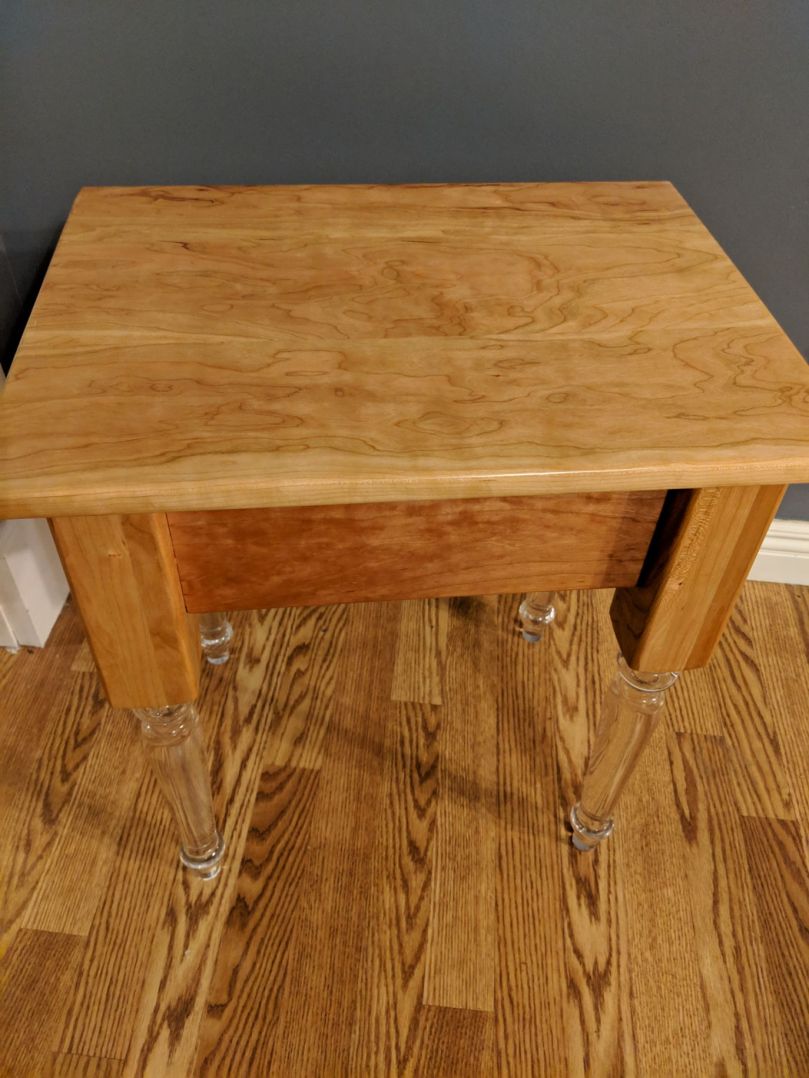
Moving on to the top, I also opted to go with 1×6 material. Here’s why I call this my “wild” cherry side table. Look at that grain! The oil is really going to make this pop.
The most important part of this glue-up is making sure the edges are perfectly flat (jointed) and perpendicular to the flat faces. This will ensure that the top is flat(ish) once glued up. Here’s how we’ve done this in previous builds.
My phone deleted the pictures of this piece being clamped and glued, but it’s the same as the process in the previous link. No special joinery or screws needed, just flat edges and glue!
If you’re glue-up came out perfect, skip this next step. But, if like mine, you find it’s a little less than perfect, you’ll need to pull out your hand plane again. I held a long metal ruler over one side of the table to identify the peaks and valleys. Then, I used my hand plane to gently remove those spots. Once I was satisfied with that flatness, I clamped it to the flattest spot in my shop: my table saw top. Then, plane the other side flat and parallel.
Use a table saw, circular saw, or bandsaw to cut to final dimensions.
At this point, you’re in the final stretch! With a powered sander (or a handheld sanding block) start at 120 grit, then go to 150, 220, and 320. The legs from Osborne actually come sanded to 150 already, so I just went to 220 right away on them. 320 is probably overkill for most woods, but cherry can get very blotchy when you finish it, especially if sanded to a low grit. So I went to 320.
For the finish, you have a ton of options available. The least expensive and most user friendly is wipe-on formulated polyurethane; I’ve used this in previous builds. I wanted something that would really penetrate the cherry though, so I went with Minwax “tung oil” varnish. Despite what the name says, there’s no actual tung oil in there; it’s just a wiping varnish. DO NOT buy 100% tung oil for this project; it never dries, and it will not work well in this case.
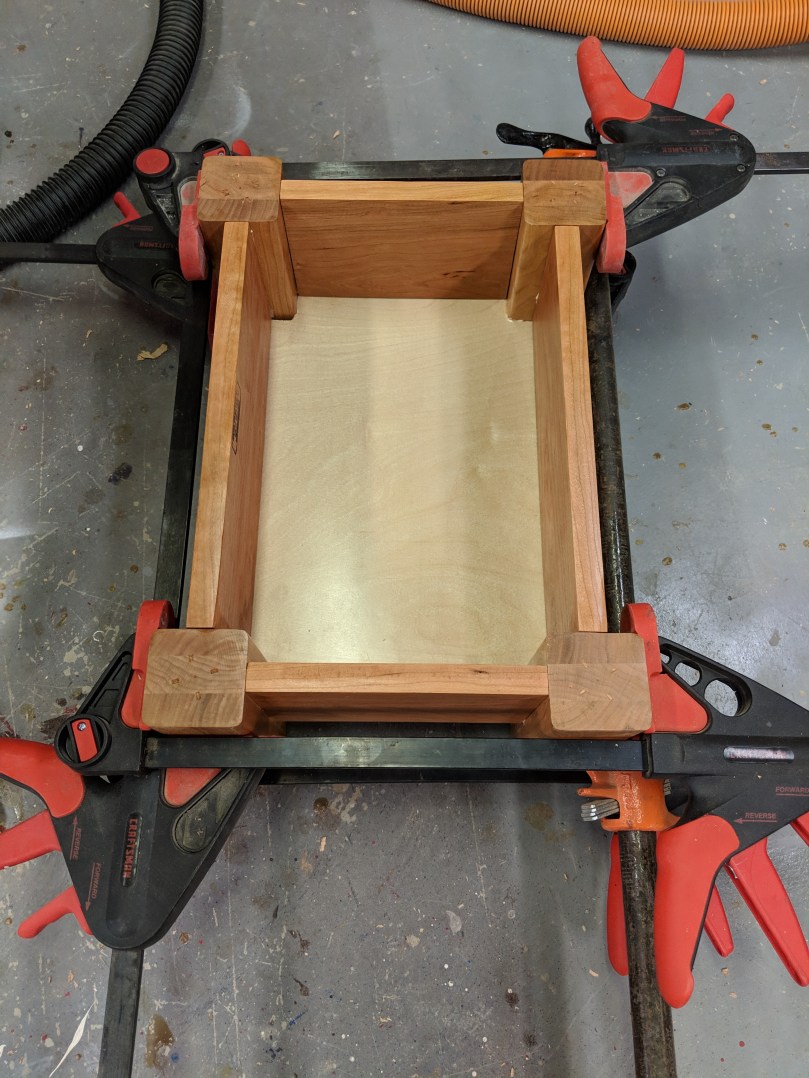
After two coats of the finish had fully dried, I applied wood glue to the tenon and inside of the mortise, assembled everything, and clamped it in place. The most important thing to do is make sure it’s on a flat surface so you make sure it doesn’t wobble. Also, make sure to measure the diagonals; if they’re equal, you know the table is squared.
I put the legs on during glue up to make sure the table didn’t wobble
I opted to use polished brass “non-mortise” hinges. All that means is you don’t have to chisel any wood out to make the hinges sit flush. Here’s a link to the page on Rockler where you can order them; I think Home Depot may carry them as well.
Mark pilot holes, and use a hand screwdriver or battery screwdriver (not a drill!) to put the screws in.
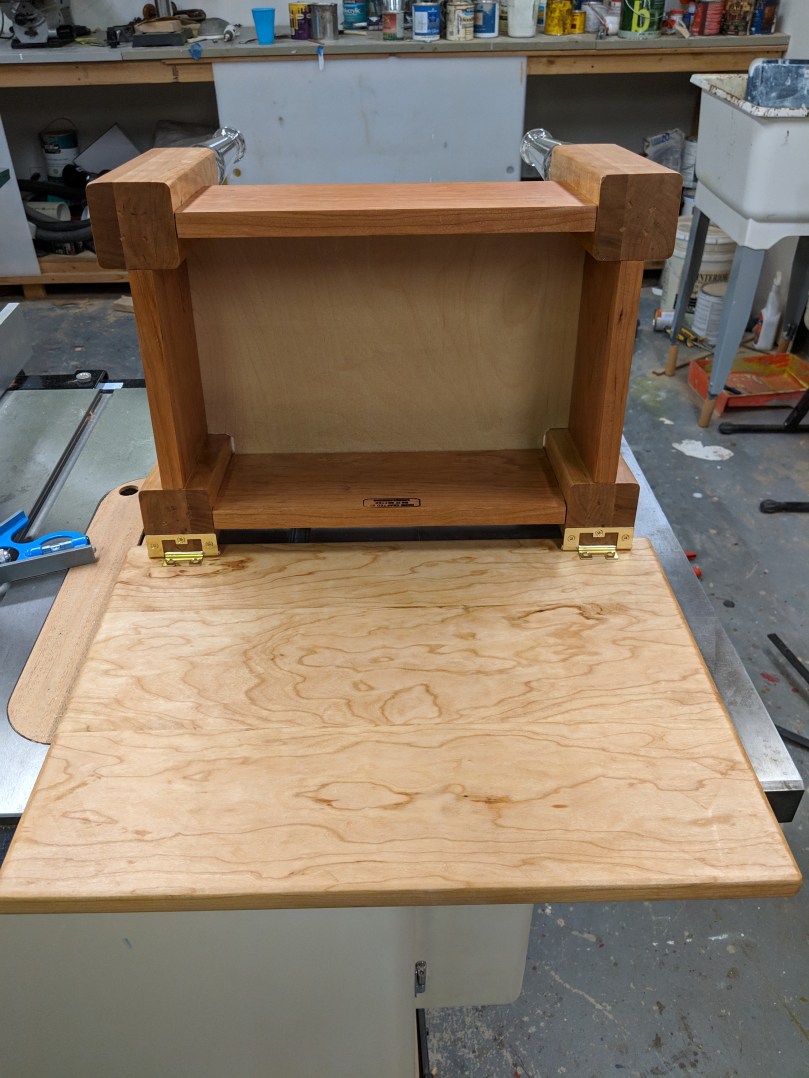
Turn the table top upside down, place the hinges on there so that the back will overhang by one inch. Pilot holes, and screws. I also decided to add one of these brass lid supports to hold the top open. I may add a second, but one seems to hold well.
Well, the end is nigh! In a good way though. Once you’ve finished part two of the table top build the rest if very simple!
Start by using a chamfer bit to get a 45 degree profile on all of the corners. This will reduce the sharp edges, and give the table an elegant edge profile. I used this great cordless trim router I got for Christmas, but literally any router will work. If you’ve managed to make it this far in the build without the use of a router at all (wow, serious kudos if so) then just use a block plane to add the chamfer. Sand everything down to a universal smoothness, starting with 80, then 120, the either 180 or 220 grit (this will depend on wood type and stain type, a whole separate blog post on its own…).
Vacuum everything, then apply stain. I used General Finishes Antique Oak, in a water based formula. This causes it’s own unique issues, since the water in the stain will raise the grain some. You can either 1) wipe the whole table down with a damp cloth, let dry, then sand to final grit again (essentially pre-raising the grain) or 2) apply the stain, apply sanding sealer, then sand. I went with #2.
The shellac based sanding sealer does two things; it helps protect the stain from being removed when I lightly sand the raised grain off. It also keeps the Aquacoat (see below), which is water-based, from reactivating the stain.
The table after stain and shellac
For the finish, I elected to do multiple steps, in an attempt to reduce the rough texture you can get from the coarse grain of oak. To do this, I opted to use Aquacoat clear grain pore filler. Lightly scuff sand the table after both coats of shellac go on with 220 grit sandpaper. Apply Aquacoat to directions on the container. I did two layers. If you use a less grainy wood, like Maple or Cherry, this step won’t be necessary.
After the Aquacoat, allow to dry for a minimum of 72 hours before applying an oil based finish. Finish with a three coats of General Finishes Arm-r-Seal.
You’re remember that the frame looks like this after being built:
On each of those four short braces, we’re going to put four figure eight clips. These clips allow the table top to move freely as the seasons cause it to expand and contract. Mark out four spots on each beam, far enough into the taper that a 3/4″ #8 screw can go in. I chose to put all 16 fasteners facing the space between each set of beams so they won’t be seen. Use a router or forstner bit in a drill to make a small 3/4 inch diameter cutout that is the depth of the figure 8 clip. Predrill holes, and fasten them to the table base and table top!
Well, we’re finally getting toward the end of this project; or at least it feels like it. However, this part was by far the most intimidating part of the process for me. It took a lot of skills that I’ve never tried before.
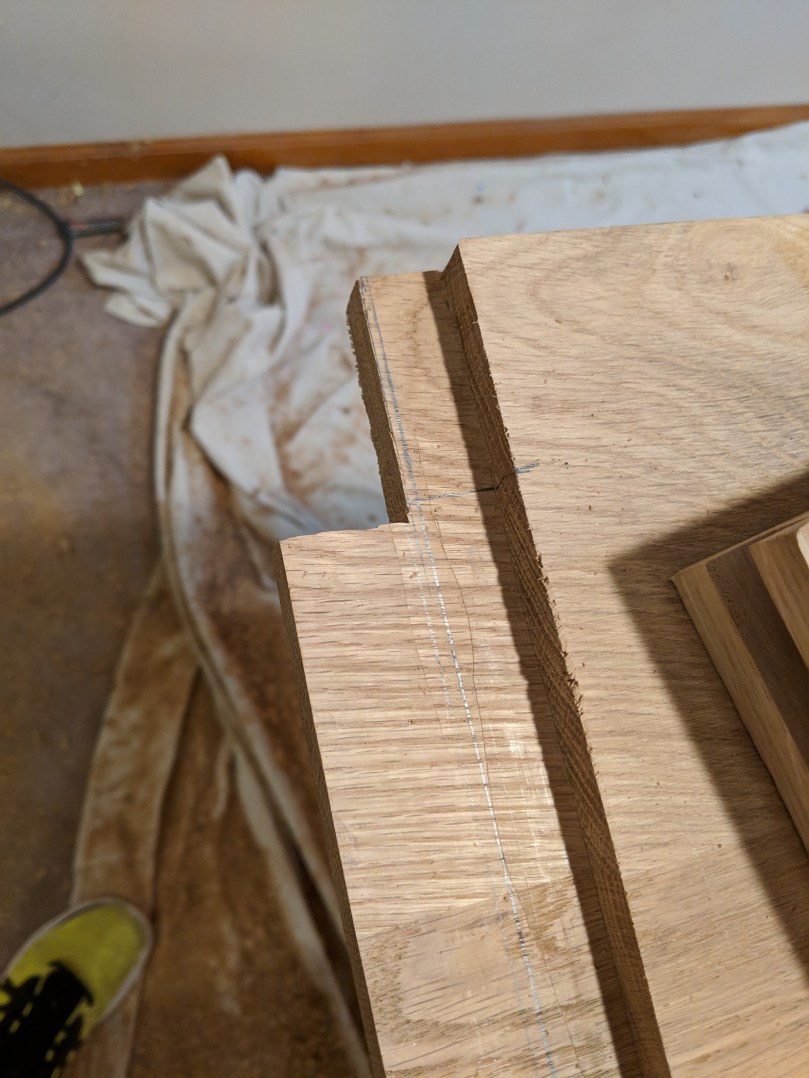
I sent the two pieces I made in the previous post off to a local lumber yard that let me use their drum sanding services. For a fee, they took those pieces and sanded them down to an even 1.5″ thick on each one. Once I got them home, I glued the two pieced together the same way we did in the last post. Before you glue, though, take this opportunity to start your final dimensions of the table. Take one of the two pieces, measure from what will be the glue line out 20″. Use a straight edge guide and cut this out with your circular saw. Now, one of your boards is exactly 20″ wide and both sides are parallel. After you glue, you can use that side you just cut as a reference for cutting the other side at 40″. Then, square up the ends at 94″. Why 94″? The final length is going to be 96″. We will two 3″ breadboards on each end (explained later). However, each breadboard will be attached to a 2″ tenon. So we need 94″ total.
Confession time? My table is a quarter inch narrower than it should be. I’ve always said I won’t hide my mistakes! The MDF edge guide I used flexed in the center of the table length while I was cutting and took more off the center than it did the ends. So, having learned my lesson, I reset the straight edge of fix this, but this time I added a clamp in the center of the guide too. When I got halfway down the table, I moved the clamp behind my saw so I could finish the cut. Learn from my mistakes!
Even though the top two pieces should have basically been exactly the same thickness, I did have a slightly raised glue joint on one end. I was able to clean this up with my hand plane.
NOTE: I did not sharpen my plane before I used it (actually, for a long time before I used it). BIG mistake. I ended up gouging a few spots, and had to belt sand them out. Sharp tools are a godsend, dull ones make everything harder. Lesson learned.
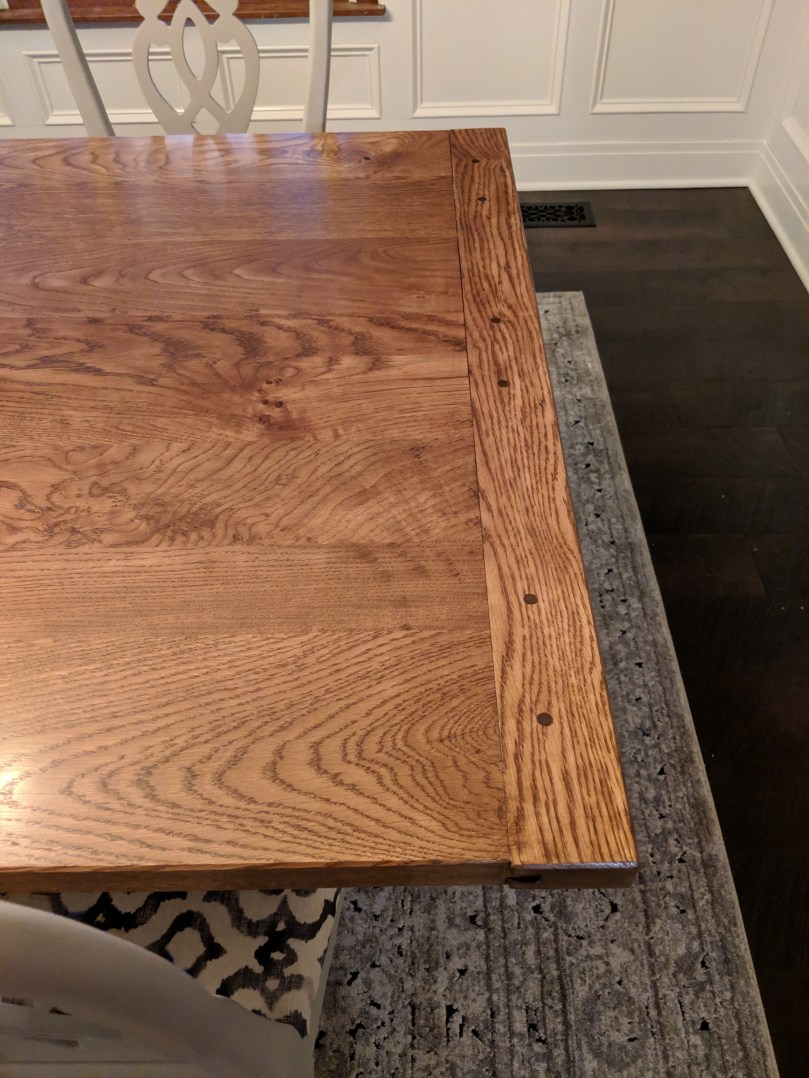
On the ends of the tables we’re going to be using breadboards. Here’s a GREAT article on what they are, and why they’re necessary. Essentially, the table top is going to want to expand and contract from side to side as the seasons change. As the pieces expand at different rates and in different ways, the table could warp or cup. The solution it to fasten to boards on the ends to hold everything flat.
Here’s the kicker: if you don’t do that properly, you could ruin the table. If you just use screws to attach the pieces (as many, MANY DIY furniture blogs would have you do) you’ll actually keep the table from expanding and contracting. This will, inevitably, cause cracks and damage to the table. The solution? A tongue and groove joint with haunched tenons!
I did a pretty poor job documenting the pictures as Don and I worked on this, but here’s the steps:
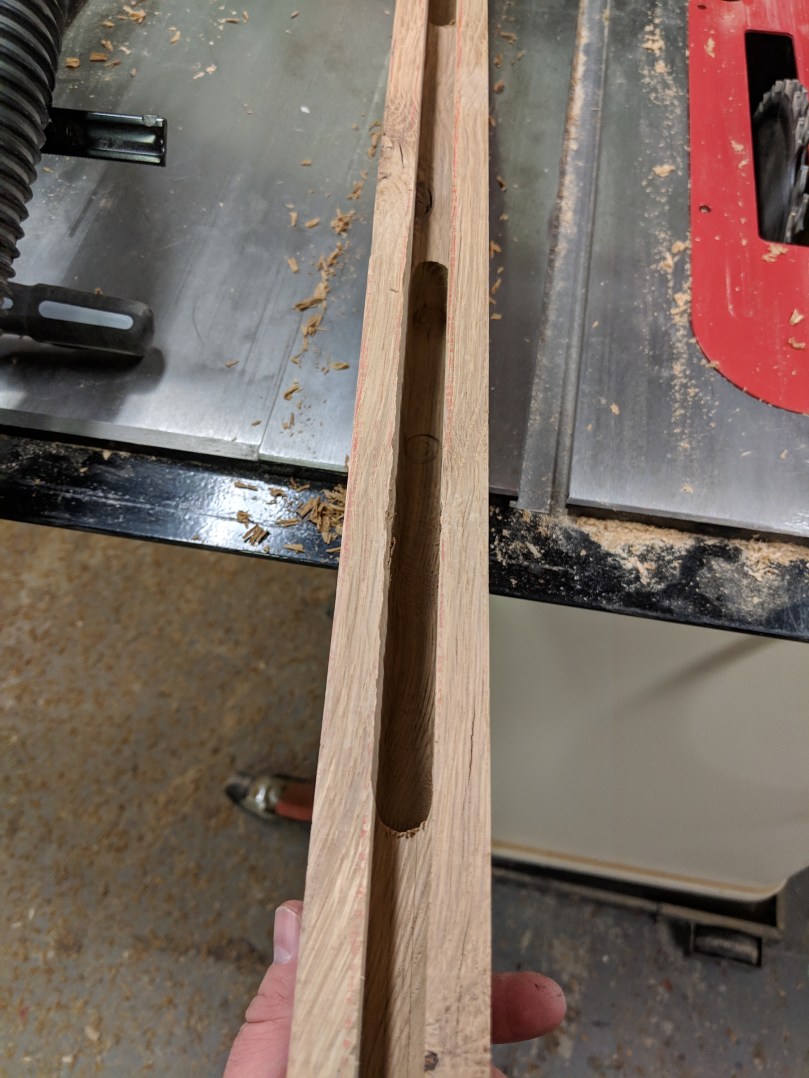
Cut a board that is about 2 inches longer than the width of your table. Plane it to the exact thickness of the table.
Mark out your mortises/tenons. I chose three tenons, each 7 inches in length. The space between each tenon was also 7 inches. This left 2.5″ on each side for the haunches.
Add about 1/8 inch on each side of where your tenons are marked. This will allow the tenons to move as the table expands.
Using a dado blade or router bit, make a groove in each breadboard. Because my table was 1.5″ thick, I opted for a half inch groove. I went about 3/4 inch deep to balance strength and aesthetics.
About 1/8 inch at a time, plunge out the mortises with your router. We did it on a table by marking out the mortises and slowly lowering the piece onto a half inch spiral bit.
Set a guide on your table so that it will take 2 inches off each side. A really handy trick I found was to use scrap pieces as the spacers between two pieces of plywood. Glue them together so the spacers are exactly as wide as the table. After the glue dries, joint one edge of the plywood pieces so they’re dead straight. When you clamp this guide to the table, you’ll ensure that the shoulder of each side of the tenon matches up on each side!
Mark and cut out the tenons.
Leave a little extra and fine tune as needed.
It doesn’t have to be pretty, but it should be tight. I used my block plane and chisels to tune everything up.
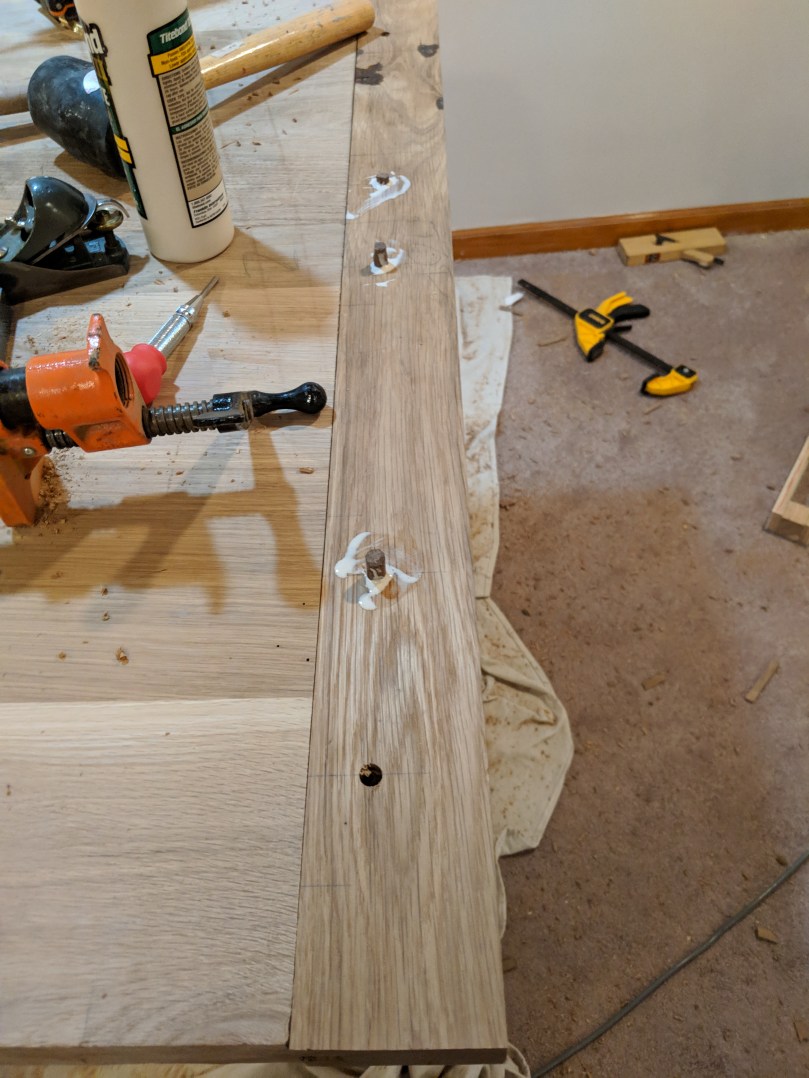
Mark two hole locations on each breadboard where the tenon will enter the mortise. I went 1.5″ in from each side of the tenon, and 1″ deep off the shoulder of the breadboard. It’s all aesthetics, really. I decided to use walnut dowels, 3/8″ thick to drawbore everything. The walnut will add a really nice contrast. You could use any hardwood, really.
Here’s the really important part: ONLY ADD GLUE TO THE CENTER TENON. You want the other tenons to be able to move back and forth and float. Now, in my picture below, you’re probably noticing I have glue on the outside dowels, right? Well, what I did was drive them most of the way in, apply a tiny bit of glue to the dowel, and then tap it in about another 1/4 inch. That means the glue is only sticking the dowel to the breadboard, not the tenon.
Cut off the dowels with a flush cut saw, clean up with a chisel and sand.
Now that you’ve seen my pictures, I cannot emphasize enough how much you need to watch this video. There were a few steps I didn’t document well, such as elongating the dowel holes on the outside tenons. Watch the video! That’s my cop-out for the day.
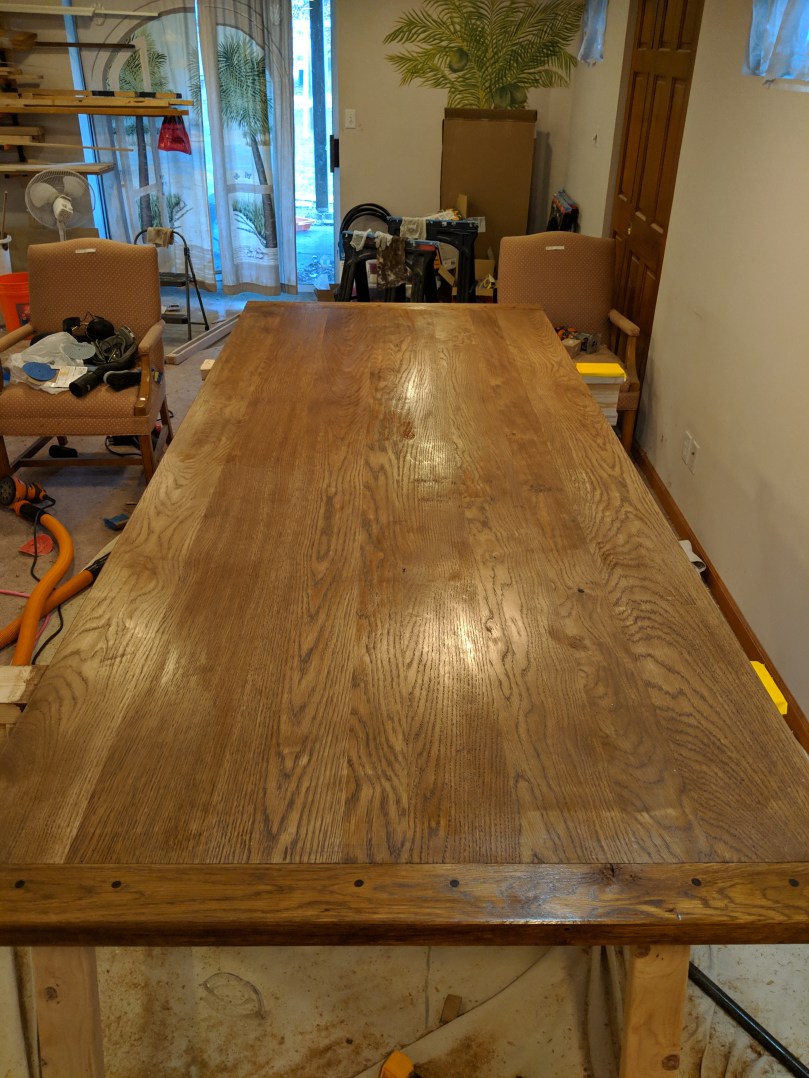
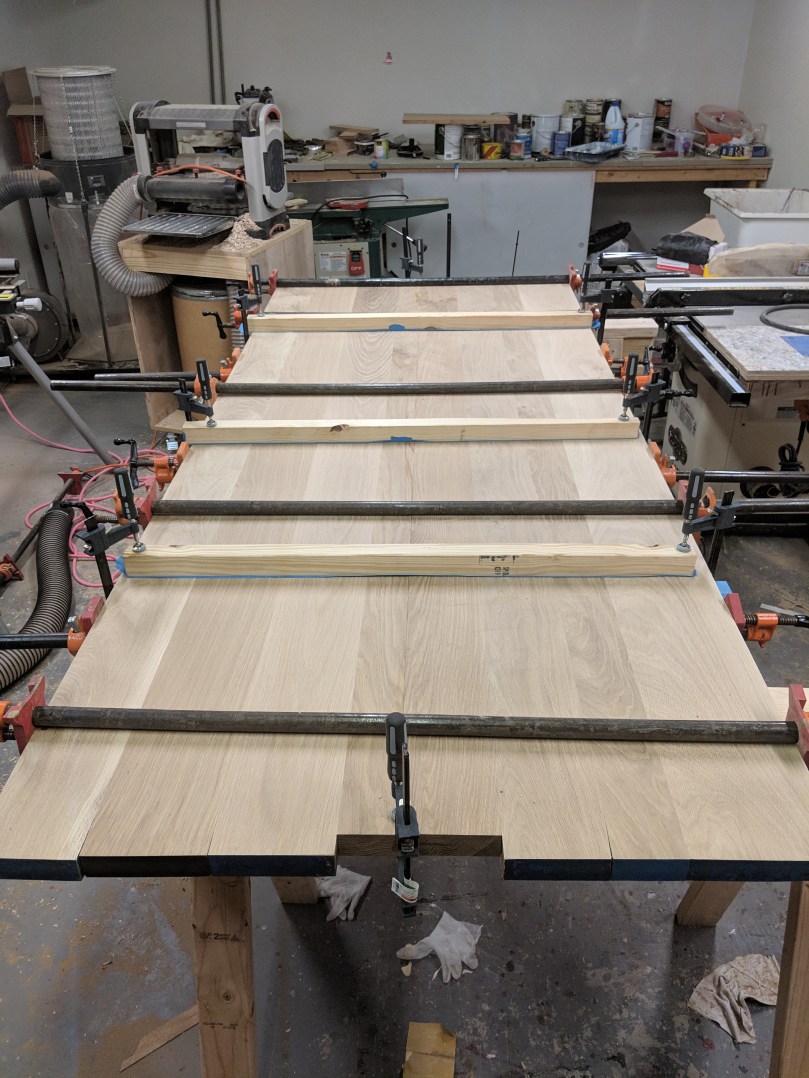
I’ve taken a somewhat minimalist approach on this post, because I’ve covered a lot of these topics before. To build the table top, we’re going to start with 8/4 lumber. I chose white oak, in part because of the cost (relatively less expensive) and in part because I am a big bourbon drinker, and like the idea of using its signature coopering wood in my build! As a bonus, it makes the shop smell fantastic after you work with it; it’s like walking into a rickhouse!
If you start with 8/4 rough lumber, you’ll need to do the same steps we did for the hard maple frame in the previous post; joint one face, plane the other side parallel, then joint the edges perpendicular to the faces. I was shooting for 1.75″ thickness, which would leave a quarter inch to sand and surface the table top once everything was all glued up. My final thickness will be 1.5″.
If you don’t have access to a jointer or planer, buy S3S or S4S pre-surfaced lumber, and use a hand plane to joint the edges. You want them as flat and squared as possible. This will ensure a solid glue joint. After laying out the boards for the appearance you’d like, use this method to joint the edges.
Laying out the boards for appearanceI would have REALLY liked to avoid that piece of sapwood on the top right board being on the inside. But, the other side of the board had some worse imperfections, and this was the only way to make it work.
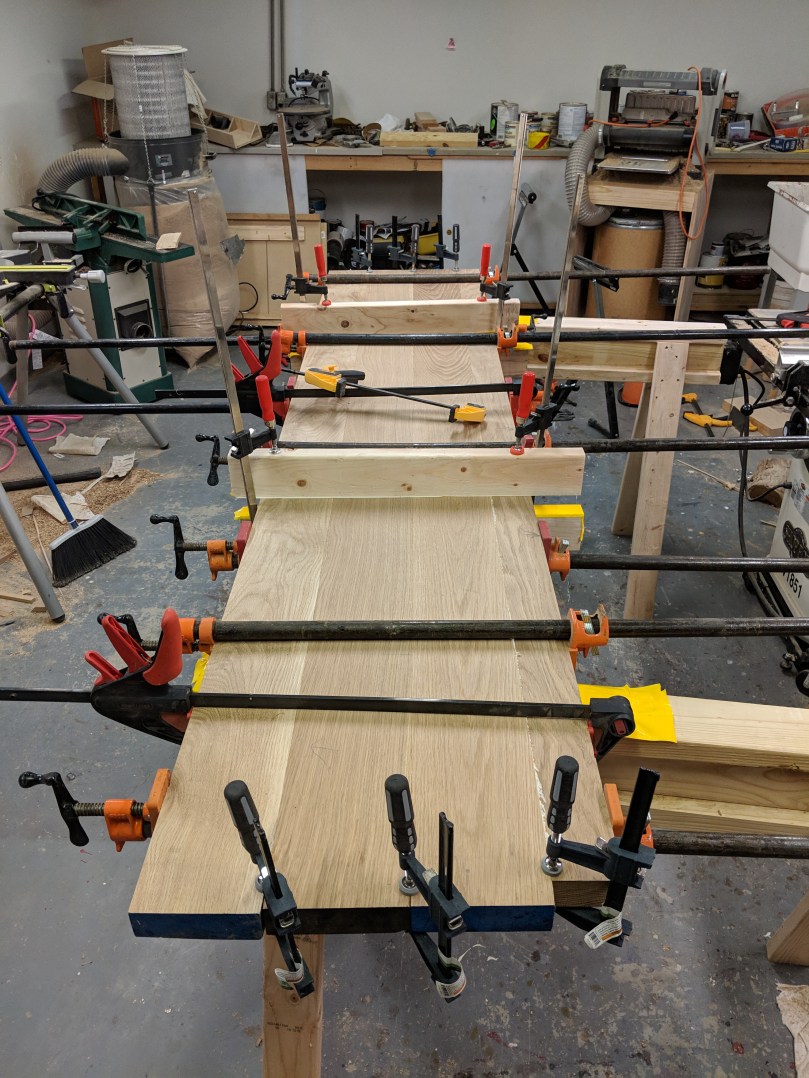
Once you have the board layout together, it’s time to prep for gluing. I made some custom 48 inch sawhorses to support the whole thing using this guide. I then put some duct tape on the top to keep the boards from sticking to the sawhorses.
Now it’s time to clamp. While my pipe clamps are five feet long and I could technically clamp the whole table top in once piece, I decided to do it in two pieces. Doing two, ~20 inch pieces would allow me to send it to my local lumber yard, where they could flatten each piece and sand it down to exactly 1.5″ on their 36″ drum sander. For those who don’t have access to a service like this, I’ll cover some other options later. After I get the two pieces back, I’ll only have one glue seam on my final piece as I join those two pieces, which can be easily flattened with a hand plane.
Spread a good, quality wood glue like Titebond 3 on the edges, using an acid brush or foam brush to make sure you get a nice, even layer.
I used cauls to help keep the top as flat as possible. Essentially, you tape two pieces of wood (I used 2×4 scraps) and flatten one side each. Then, clamp them down to the table top to keep everything flat. Pipe clamps do the majority of the work providing pressure for the glue up. I got 10 of these Pony clamps for $125 with the pipes, which is a ridiculous Craigslist find. The guild also has a bunch of clamps I could have used.
Follow the directions on the glue bottle, but leave this clamped for at least an hour, if not more. When the glue is kind of tacky, use a cheap chisel or metal scraper to remove the glue that squeezes out.
AUTHORS NOTE: The first time I published this, I wrote solely on how to do this using machinery that I had at my mentor’s house. I realized, afterward, that part of why I started to write this blog was to make these projects more accessible. So, I have now added italicized instructions which clarify how to accomplish these items without access to expensive machinery.
First and foremost, sorry for the long delay between posts. I haven’t stopped working, but the projects have been household maintenance related (and puppy training related!).
The cause of much of my delay…
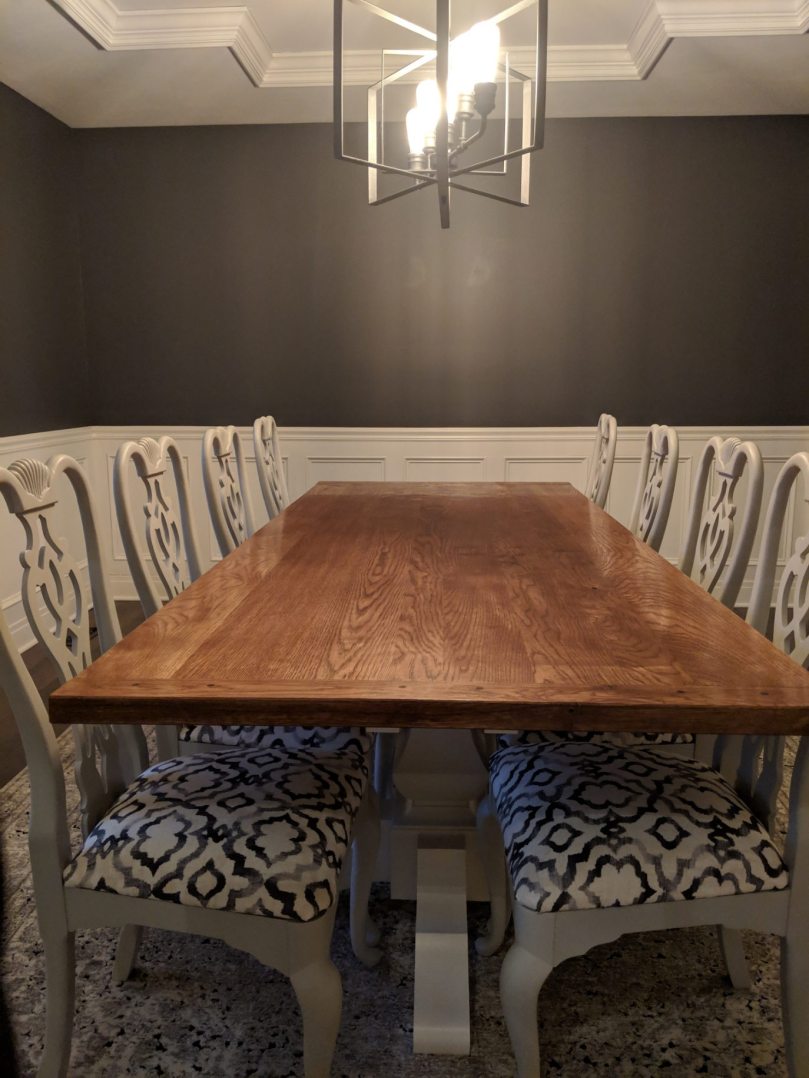
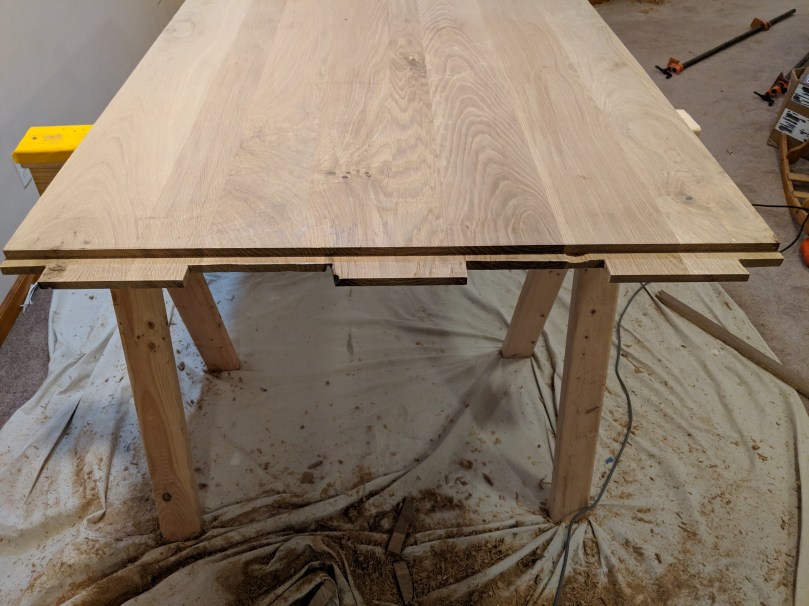
Just in time for the holidays, I’ve started the building process for our new dining room table. I used several different styles as the overall inspiration for this table. It’s somewhat influenced by the farmhouse style, in that it will have a large, thick slab of wood for the top instead of a thinner top with aprons on the side, like a more traditional table you’d see.
We want a table that can regularly seat 8 people, but could expand to 10 when necessary. Our room is about 14′ long by 12′ wide, so we decided to go with a 40″ x 96″ table. For the height, we’re going to be right at 29″ tall, which is about standard. To make sure this was the right fit, I cut a sheet of plywood and placed it on some sawhorses in the room.
It’s huge! But in a good way. And, actually, it fits pretty well within the normal spacing parameters. The long sides are each 50″ from the walls, and the short sides are right at 30″. Everything I found recommends 36″ to allow for chairs and room to move. Since we won’t regularly seat people on the ends, I’m not worried that we only have 30″ there. That also leaves us 14″ for a china cabinet on the right wall, which should be just about right for my grandmother’s cabinet we will be using in the future.
I have been very, very lucky to be paired with Donald Turner as my woodworking mentor through the St. Louis Woodworker’s Guild. Don has been a great resource for design, construction, and technical advice. He’s helping me take my idea and make it reality, and I can’t be more grateful. The entire frame building process took place at his shop, which makes mine look puny! Here’s the design he helped draft based on my ideas: Pedestal Table 2D design
For the table base, I’m using this kit from Osborne Wood Products. I ordered it in soft maple, since we’ll be painting the entire base and frame. We also opted for the “extended” version that is a little longer and includes a third leg on each pedestal. If you were going to make your table smaller and sit people on each end (say, a 72″ by 36″ table) you’d probably want to opt for this kit.
The top of this table is going to be solid white oak, 1.5″ thick. My best estimate is it will be about 200 lbs. Strength is key here, and it’s better to overbuild. I could use oak for the frame, but the grain would be difficult to hide. The base is soft maple, but I don’t think that’s really going to be strong enough for the frame pieces. On Don’s advice, I opted for hard maple. It’s strong, cheap(ish), and paints well. I purchased it rough cut in 8/4 from WunderWoods in St. Charles.
If you don’t have access to a jointer and planer, consider buying S3S or S4S presurfaces 8/4 lumber. While it won’t be perfectly flat, it will have most of the work done, and you can clean it up with a hand plane.
Since it’s rough cut, the first step is to establish a flat side. That’s a job for a jointer. Don’s jointer makes mine look like child’s play.
I’ll put this on my Christmas list
Once we established a flat side, we can use the planer to make the opposite side completely flat and parallel.
Multiple passes required
We took the thickness down to 1.75″. We then ripped the pieces to 2.5″ widths, and cut them down to final length on the miter saw. The two long stretchers were 90″ and the four shorter stretchers were each 34″.
We’re using a half lap joint to build the frame. This will make a strong frame that can be easily assembled. It’s also a relatively simple joinery technique. The top of the pedestal is 8″ wide, so we laid out the spacing for each lap joint accordingly.
Set the table saw to exactly half the width of the board, then cut through it in multiple passes (pictured below). Use a miter gauge or crosscutting sled on your table saw to do this. You could also cut it with a handsaw, bandsaw, or even a jig saw. Just make sure you’re consistent. Use a chisel to remove the waste.
To cut the taper, we marked the line with a pencil based on the design Don drafted. Then, we cut about 1/16th inch off that line on the bandsaw, and used the jointer to clean the edge up.
In absence of a bandsaw, use a straight edged piece of MDF to guide a circular saw to cut the angle, similar to how I’ve cut sheet goods in previous posts.
Checking the fit
I forgot to get pictures of the next step, but hopefully a written explanation should suffice. With the frame on a table, bottom side up, place the pedestal (bolt side down) onto the frame. Align the pedestal with a square so that the sides are flush with the frame, then mark where the bolts touch.
Using the smallest bit you have, drill a small pilot hole through center of the spots where the bolts were marked. We used a drill press to ensure the holes would be square, but you could get away with a drill guide like I’ve shown previously.
Turn the pieces over, and using a forstner bit (on a drill press) or spade bit (on hand drill), make a hole large enough to receive the washer that came with the kit, and drill about halfway through the wood. Then, drill out a 3/8 inch hole through both sides where the bolt will go through.
The picture below is how it looks when assembled. I sat on it, and it had no problem handling my weight. We don’t plan on gluing any of the half lap joints; the bolts should pull everything together, and it will be easier to move if it’s not glued.
This is a recent piece my friends commissioned for their home office. They wanted to be able to work next to each other, but weren’t able to find something they really liked off the shelf. The top of the T is 9.5 feet long. Table top is 3/4 A2 walnut plywood framed with 6/4 lumber. Cabinets are the same plywood, with prefinished birch drawers and solid walnut faces. All finished with a layer of shellac, then grain filler with Zar Moorish Teak, then three coats of semi gloss Arm-r-seal.
I’ll start by admitting I didn’t do a great job photographing every step, but that’s partially because this was a custom job for my friends, and I wanted it to be a one-of-a-kind piece, so I didn’t upload plans like I normally would. The top is built in three sections for transportation and convenience. The top pictured is one of two that creates the top of the T. It is 3/4 walnut ply, cut to 23″ in width and 56 inches in length. The frame is walnut, cut to about 1″ thick with a 1″ rabbet on which the table top rests and is glued to. This makes the desk 24″ wide by 57″ tall.
On the mitered corners, to add some strength, I decided to put some splines. I clamps these two scraps to the table top, then used my biscuit joiner to cut a spline into the miter. Two splines on each corner.
I took some walnut and planed it down to fit snugly into the splines; about 14mm or so. Glued in place.
Drawer faces in process. I know the opening to my cabinets is 25.5″ tall, so I am opting for 26″ of total drawer face, leaving a quarter inch overhand on the top and bottom.
Planed, sanded, awaiting the finish.
Plywood cabinet boxes built using general dimensions from this video. I decided to add a back, get rid of the top (since it will be covered with the desk top) and add a piece of support to the top of the front as well. Additionally, instead of trimming it out with lumber, I edge banded the plywood with walnut veneer.
Here you can see some of the pockethole screws. I tried using a knock-off from Amazon, but had really bad results. The lock ring was loose, and even when it wasn’t loose, the depth on the holes was too deep and the points of the screws poked through. Kreg K4 to the rescue! Well worth the extra cost, worked like a charm. Drawer slides are from Rockler.
Half inch prefinished ply for the drawers, with a 1/4″ groove for 1/4″ prefinished ply to create the bottoms. The Kreg Microjig was a lifesaver here as well. I modified the plans from the video so that the screws would be on the face (which will be covered by the solid walnut front) and on the back, where they won’t be seen.
A look at one of the cabinets after completion.
The final product, assembled! Metal L brackets on the corners where the parts join, and I simply plywood box built to add extra support on the back. Metal brackets sit inside the file cabinet and screw up into the plywood to hold the top down.


 Check for square by measuring the diagonals before the glue dries. Let it sit. We will apply the finish later, once the top is attached and the legs (which will dissolve if the finish touches them) are removed!